# Transak | Documentation # What is Transak Transak lets your users buy and sell crypto directly inside your app. It handles KYC, regulation and compliance, fiat payment methods, and crypto coverage so your team can stay focused on building product and growing revenue. Whether you are a startup or an established business, you can integrate Transak's fiat on-ramp and off-ramp in just a few minutes using our Integration Options. ## Products overview A one‑stop solution for users to buy crypto with fiat inside your app. A one‑stop solution for users to sell crypto to fiat inside your app. A one-click NFT solution where users buy NFTs with fiat. ## Get started? Sign up at the Partner Dashboard using your corporate email. You'll get immediate access to the order dashboard and staging API key, so you can start building and testing your integration right away. Submit your KYB form so our compliance team can review and approve your application. KYB is required to gain access to your production API key. Please use the same email address used to create your partner dashboard account. Once you have the partner account, you can get started with the integration into your platform. Choose your integration type. Click a tab to view the relevant options: Integrate our APIs in your backend to build a fully custom UI and user journey. Redirect users to Transak's hosted flow via the Web to complete their fiat-to-crypto purchase or crypto-to-fiat sale. Add the Transak Embed to your web app using an iframe. Add the Transak Embed to your JavaScript app with our SDK. Add the Transak Embed to your Android app. Add the Transak Embed to your iOS app. Add the Transak Embed to your React Native app. Explore our documentation for everything that's possible with Transak. Click a tab to view the relevant features. Authenticate users without re-login into Transak's flow Share KYC data from your platform with Transak using Sumsub Configure Embed behavior with URL parameters for On Ramp, Off Ramp, and NFT Checkout Customize the look and feel of the Transak widget using query parameters Check supported countries, fiat currencies, payment methods, crypto coverage, fees, and transaction limits across products. Countries, fiat currencies, payment methods, fees, and limits. Supported cryptocurrencies and blockchains. Supported payment methods, fees, and transaction limits for on-ramp flows. Supported payout methods, fees, and transaction limits for off-ramp flows. Supported payment methods, fees, and transaction limits for NFT Checkout. Reach out if you have questions. Contact the team and find resources to help with your integration. # Auth Reliance **Auth Reliance** allows partners to authenticate users without requiring them to re-login into the Transak authentication flow. This feature is exclusively available for [Whitelabel API integrations](/integration/api). ## Problem Statement Integrating third-party payment services often forces users to create separate accounts and log in multiple times, disrupting the user experience and increasing friction in the conversion funnel. Here are some of the **key challenges** with traditional authentication flows in payment integrations:
Redundant authentication Users must re-authenticate with third-party services even though they're already logged into your platform.
Higher drop-off rates Additional authentication steps create friction points that lead to user abandonment and lower conversion rates.
Poor user experience Users are confused about why they need to create yet another account or log in again during payment flows.
Slower transaction flows Multiple login steps add unnecessary delays to time-sensitive payment transactions.
## Our Solution Auth Reliance eliminates redundant logins by allowing partners to pass authenticated user credentials directly to Transak, creating a seamless, uninterrupted payment experience. Here are some of the **key benefits** of the Auth Reliance solution:
Seamless Authentication Users stay authenticated without re-entering credentials or creating new accounts.
Higher Conversion Reduce friction and drop-offs by eliminating redundant authentication steps.
Better UX Keep users in your app's flow without disrupting their journey.
Backend Security Server-to-server authentication with IP whitelisting ensures secure transactions.
## How does it work? ## Current Limitations Auth Reliance APIs are to be called only from the partner backend and subjected to the whitelisting of partner IP addresses. Direct API calls from the frontend apps are not supported. ### Payment Methods
Supported Payment Methods
Yes Bank transfers, Open banking
No Cards, Apple Pay, Google Pay
## How to integrate? ### Enable Auth Reliance Follow the steps in the [Need help in Integration](/getting-started/help-and-support#need-help-in-integration) section to reach us. Then raise the request to enable **Auth Reliance** for your API key. Share your public IP addresses with Transak for whitelisting. ### Configuration Use [Onboard User API](/api/whitelabel/user/onboard-user-auth-reliance) to create the user or fetch the existing user details for Auth Reliance. Sample request: ```bash curl --location --request POST 'https://api-gateway-stg.transak.com/api/v2/user/onboard' \ --header 'x-user-identifier: USER_IDENTIFIER' \ --header 'x-access-token: PARTNER_ACCESS_TOKEN' ``` Include these headers in your [Whitelabel API requests](/api/whitelabel). These are required for Auth Reliance to identify the authenticated user and authorize the request:
Partner access token (see [guide](/guides/how-to-create-partner-access-token)) User's email address
# KYC Reliance using Sumsub **KYC Reliance using Sumsub** allows partners to reuse their existing Sumsub KYC data with Transak, eliminating the need for users to complete verification again. ## Problem Statement Traditional integration flows require users to complete KYC verification separately for each platform, creating unnecessary friction and delays in the user journey. Here are some of the **key challenges** with duplicate KYC processes:
Redundant verification Users must repeat KYC verification even though they're already verified on partner platform.
Slower onboarding Additional KYC steps significantly delay user onboarding and increase time to first transaction.
Poor user experience Users are frustrated by having to upload documents and complete verification multiple times.
Lower conversion rates Duplicate KYC requirements create drop-off points that reduce user conversion and activation.
## Our Solution KYC Reliance allows partners to share their existing KYC data with Transak using Sumsub, eliminating duplicate verification and creating a seamless one-click onboarding experience. Here are some of the **key benefits** of the KYC Reliance solution:
Instant Onboarding Onboard verified users to Transak in under a minute without additional verification.
No Repeat KYC Users leverage their existing KYC verification without re-uploading documents or repeating checks.
Secure Data Sharing Self-serve, secure integration through Sumsub's token-based KYC data sharing.
Higher Conversion Eliminate KYC friction to significantly improve user activation and conversion rates.
## How does it work? ### Mandatory Fields For seamless user onboarding, ensure the following fields are validated in Sumsub and included in the shared token:
Field Validation Valid Format
First Name 1 to 50 characters John
Last Name 1 to 50 characters Doe
Date of Birth (DOB) Age 18–150 years dd/mm/yyyy, dd-mm-yyyy, dd.mm.yyyy
Mobile Number Valid number with + and country code +11234567890, +919876543210
Address Line 1 1 to 200 chars, at least one alphabetic, valid postcode format 123 Main Street, 2nd Avenue
Address Line 2 Optional, 1 to 200 chars
City 1 to 50 characters Austin
State 1 to 100 characters Texas
Post Code Valid postcode 45123
Country Code Valid country code FRA, IND
ID Document Valid supported country document Passport, Driver's License, Residence Permit, ID Card
Advanced Liveliness Valid live selfie Live selfie
## How to integrate? ### Sumsub Configurations Access your Sumsub account at [cockpit.sumsub.com](https://cockpit.sumsub.com/). Go to `Integrations → Application Levels → Individual`, click **Create Level**, and name it `Transak KYC Reliance` (or use your preferred identifier). Enable **Identity document** and **Selfie** verification types. Ensure all document types and selfie options are properly configured. Partners need to share their respective email IDs with Transak to receive the donor access token via a secure link. Access your Sumsub account at [cockpit.sumsub.com](https://cockpit.sumsub.com/). Go to the Partners section in your Sumsub dashboard. Click **Add Recipient** and enter the donor token provided via secure link in the pop-up. ### Integration Options Integrate our APIs in your backend to build a fully custom UI and user journey. Redirect users to Transak's hosted flow via the Web to complete their seamless KYC data sharing. Add the Transak Embed to your web app using an iframe. Add the Transak Embed to your JavaScript app with our SDK. Add the Transak Embed to your Android app. Add the Transak Embed to your iOS app. Add the Transak Embed to your React Native app. ### Integration Steps Access your Sumsub dashboard at [cockpit.sumsub.com](https://cockpit.sumsub.com/) and open your project. Retrieve your `APPLICANT_ID` (e.g., 665xxxxxxxxxxxx6a0) from the dashboard. Generate your KYC share token using the Sumsub API with the following parameters:
The Applicant ID retrieved from Step 2
Must be set to `transak` to share data with Transak
Token validity in seconds (e.g., 600 for 10 minutes). Maximum 1200 seconds (20 minutes).
**API Request:** ```bash curl --request POST \ --url https://api.sumsub.com/resources/accessTokens/shareToken \ --header 'content-type: application/json' \ --data '{ "applicantId": "APPLICANT_ID", "forClientId": "transak", "ttlInSecs": "600" }' ``` Include the KYC share token in your [Create Widget URL](/api/public/create-widget-url) with the following parameters:
Set to `SUMSUB` (hardcoded value for Sumsub provider)
The secured KYC share token generated in Step 3
**API Request:** ```bash curl --request POST \ --url https://api-gateway-stg.transak.com/api/v2/auth/session \ --header 'accept: application/json' \ --header 'access-token: YOUR_ACCESS_TOKEN' \ --header 'authorization: YOUR_USER_AUTH_TOKEN' \ --header 'content-type: application/json' \ --data '{ "widgetParams": { "apiKey": "YOUR_API_KEY", "referrerDomain": "yourdomain.com", "kycShareTokenProvider": "SUMSUB", "kycShareToken": "eyJhbGciOiJub25lIn0..." } }' ``` ## User Flow Demo Initialize the widget with the appropriate query parameters using any integration method. Enter your email address and verify using the OTP sent to your inbox. Proceed upon successful verification. The system fetches KYC data using the shared token from Sumsub. Transak has secured the KYC data. The user is ready to place an order instantly. # Webhooks Transak uses webhooks to push real-time event notifications to your server. Instead of polling the API for updates, Transak sends event data directly to a URL you provide to ensure faster updates and fewer unnecessary API calls. ## Supported Webhook Types Real-time notifications for order lifecycle events. Available for both **Widget** and **Whitelabel API** integrations. Real-time notifications for KYC lifecycle events. Available **only** for **Whitelabel API** integrations. ## Add or Update Webhook Webhook URLs can only be added or updated after `KYB approval` in the production environment. Follow the steps in the [Need help in Integration](/getting-started/help-and-support#need-help-in-integration) section. Provide the following details:
Field Description
Order Webhook URL Your HTTPS endpoint for order events
KYC Webhook URL Your HTTPS endpoint for KYC events
Environment STAGING or PRODUCTION
Both Order and KYC webhook URLs must use `HTTPS` and be `publicly accessible` before they can be registered. Our team will review your request and notify you once the webhook URL has been successfully added or updated. ## Order Webhooks Notify the partner’s backend in real time when an order’s status changes. These events allow partners to track order creation, status updates, completion, and failures. ### Events Screen Webhook Event Code Status Description Response JSON ORDER_CREATED `AWAITING_PAYMENT_FROM_USER` When the order is created, but the payment has not been received yet. `{ webhookData: { id: '37969614-...', ... }, eventID: 'ORDER_CREATED' }` ORDER_PAYMENT_VERIFYING `PAYMENT_DONE_MARKED_BY_USER` When the user marks the payment as done but it is not received by us yet. ORDER_PROCESSING `PROCESSING` Orders in the PROCESSING state have passed the checks and the user's payment information has been validated. `{ webhookData: { id: 'e0d9f47a-...', ... }, eventID: 'ORDER_PROCESSING' }` ORDER_PROCESSING `PENDING_DELIVERY_FROM_TRANSAK` When the payment is received and is being exchanged & transferred via us or our liquidity partner. `{ webhookData: { id: 'e0d9f47a-...', ... }, eventID: 'ORDER_PROCESSING' }` ORDER_COMPLETED `COMPLETED` When we have received the payment and the crypto is sent successfully to the user. `{ webhookData: { id: 'e0d9f47a-...', ... }, eventID: 'ORDER_COMPLETED' }` ORDER_FAILED `CANCELLED` When the user cancels the order. `{ webhookData: { id: '08c570cf-...', ... }, eventID: 'ORDER_FAILED' }` ORDER_FAILED `FAILED` When the order failed because of a card decline. `{ webhookData: { id: '08c570cf-...', ... }, eventID: 'ORDER_FAILED' }` ORDER_REFUNDED `REFUNDED` When fiat payment received from the user is refunded back to their payment instrument as cryptocurrency could not be fulfilled due to some reason. `{ webhookData: { id: '08c570cf-...', ... }, eventID: 'ORDER_REFUNDED' }` ORDER_FAILED `EXPIRED` When the user failed to make the payment within the timeframe. `{ webhookData: { id: '08c570cf-...', ... }, eventID: 'ORDER_EXPIRED' }` Screen Webhook Event Code Status Description ORDER_CREATED `AWAITING_PAYMENT_FROM_USER` When the order is created but the payment has not been received yet. ORDER_PAYMENT_VERIFYING `PAYMENT_DONE_MARKED_BY_USER` When the user marks the payment as done but it is not received by us yet. ORDER_PROCESSING `PENDING_DELIVERY_FROM_TRANSAK` When the payment is received and reconciled and we have initiated a fiat transfer to the user. ORDER_PROCESSING `ON_HOLD_PENDING_DELIVERY_FROM_TRANSAK` When the crypto payment is received & fiat is being transferred via our banking partner but our system is unable to send the fiat to the user. ORDER_COMPLETED `COMPLETED` When the fiat has been sent successfully to the user. ORDER_FAILED `EXPIRED` When the user failed to make the payment within the timeframe. ORDER_FAILED `FAILED` Due to third-party failure. ORDER_FAILED `CANCELLED` When the user manually cancels the order. ORDER_REFUNDED `REFUNDED` When cryptocurrency payment received from the user is refunded back to their wallet as fiat payout could not be fulfilled due to some reason. ### Decrypting the Webhook Payload The webhook `data` field is a signed JWT that should be verified using your **Partner Access Token** before you process it on your backend. Follow the step-by-step guide with JavaScript, Java, and Go examples to verify and decode the webhook `data` field. ## KYC Webhooks Notify partner's backend in real-time when a user's KYC verification status changes. These events allow to track KYC submissions, approvals and rejections. ### Events The following Event IDs are triggered during the KYC lifecycle and sent via webhook
Event ID KYC Status Description
KYC_SUBMITTED SUBMITTED Triggered when a user submits their KYC details
KYC_APPROVED APPROVED Triggered when the user's KYC verification is approved
KYC_REJECTED REJECTED Triggered when the user's KYC verification is rejected
### Webhook Response #### Schema The KYC verification status (SUBMITTED, APPROVED, or REJECTED) The event identifier (KYC\_SUBMITTED, KYC\_APPROVED, or KYC\_REJECTED) The unique identifier for the user in the partner's system Custom identifier for the customer. Returned only if provided in the [Quote API](/api/whitelabel/lookup/get-quote) request. ```json Response Schema { "data": { "kycStatus": "string", "eventID": "string", "partnerUserId": "string", "partnerCustomerId": "string" //Optional } } ``` #### Sample Response ```json { "data": { "kycStatus": "SUBMITTED", "eventID": "KYC_SUBMITTED", "partnerUserId": "0870c29f-75a8-4091-a068-775fa4577172", "partnerCustomerId": "12345" } } ``` ```json { "data": { "kycStatus": "SUBMITTED", "eventID": "KYC_SUBMITTED", "partnerUserId": "0870c29f-75a8-4091-a068-775fa4577172" } } ``` ```json { "data": { "kycStatus": "APPROVED", "eventID": "KYC_APPROVED", "partnerUserId": "0870c29f-75a8-4091-a068-775fa4577172", "partnerCustomerId": "12345" } } ``` ```json { "data": { "kycStatus": "APPROVED", "eventID": "KYC_APPROVED", "partnerUserId": "0870c29f-75a8-4091-a068-775fa4577172" } } ``` ```json { "data": { "kycStatus": "REJECTED", "eventID": "KYC_REJECTED", "partnerUserId": "0870c29f-75a8-4091-a068-775fa4577172", "partnerCustomerId": "12345" } } ``` ```json { "data": { "kycStatus": "REJECTED", "eventID": "KYC_REJECTED", "partnerUserId": "0870c29f-75a8-4091-a068-775fa4577172" } } ``` # WebSockets Transak uses WebSockets to push real-time order updates to your server and sends event data continuously over a live connection to ensure faster updates. Transak WebSockets are powered by **Pusher Channels**. Use the **Pusher client library** for your platform, as a plain WebSocket client is not compatible. **Pusher App Key:** `1d9ffac87de599c61283` | **Cluster:** `ap2` ## When to Use? Use Case Channel How to track Track a single order in your frontend Public By Order ID Track a specific order using your own reference Public By API Key + partnerOrderId Track all orders server-side Private Encrypted, backend only *** ## Channels Channel Channel Name Description Receive order updates using the order ID {"${END_CUSTOMER_ORDER_ID}"} Public channel : Track an order by entering the order ID in the channel name. Receive order updates using your API Key and partnerOrderId {"${API_KEY}_${partnerOrderId}"} Public channel : Track an order using your API key and your own order reference ( partnerOrderId ). Generate a unique order ID and pass it as the partnerOrderId query parameter before opening the widget. Receive all order updates using your API Key & Access Token {"${API_KEY}"} Private channel : Track all orders using your API_KEY & ACCESS_TOKEN . The payload is encrypted - decrypt it with your ACCESS_TOKEN using the jsonwebtoken npm library. For the private channel stream, ensure the WebSocket connection is handled by your backend application, as exposing it on the client side may compromise your Access Token. ## Events WebSocket Event Code Status Description ORDER_CREATED `AWAITING_PAYMENT_FROM_USER` When the order has been created but the payment has not yet been received. ORDER_PAYMENT_VERIFYING `PAYMENT_DONE_MARKED_BY_USER` When the user marks the payment as done but Transak has not yet received it. ORDER_PROCESSING `PROCESSING` Orders in the PROCESSING state have passed checks and the user's payment information has been validated. ORDER_PROCESSING `PENDING_DELIVERY_FROM_TRANSAK` When the payment is received and being exchanged & transferred via Transak or a liquidity partner. ORDER_COMPLETED `COMPLETED` When Transak has received the payment and the crypto has been sent successfully to the user. ORDER_FAILED `EXPIRED` When the user failed to make the payment within the timeframe. ORDER_FAILED `FAILED` When the order failed because the card was declined. ORDER_FAILED `CANCELLED` When the user cancels the order. WebSocket Event Code Status Description ORDER_CREATED `AWAITING_PAYMENT_FROM_USER` When the order is created but the payment has not yet been received. ORDER_PAYMENT_VERIFYING `PAYMENT_DONE_MARKED_BY_USER` When the user marks the payment as done but it has not been received by Transak yet. ORDER_PROCESSING `PENDING_DELIVERY_FROM_TRANSAK` When the payment is received and reconciled and Transak has initiated a fiat transfer to the user. ORDER_PROCESSING `ON_HOLD_PENDING_DELIVERY_FROM_TRANSAK` When the crypto payment is received & fiat is being transferred via the banking partner but the system is unable to send fiat to the user. ORDER_COMPLETED `COMPLETED` When Transak has received the crypto payment and fiat has been sent successfully to the user's bank account. ORDER_FAILED `EXPIRED` When the user failed to make the payment within the timeframe. ORDER_FAILED `FAILED` Due to third-party failure. ORDER_FAILED `CANCELLED` When the user manually cancels the order. *** ## Integration Select your framework, then choose a channel type to get started. ```bash npm install pusher-js ``` ```bash npm install pusher-js @react-native-community/netinfo ``` ```javascript import { useEffect } from 'react'; import Pusher, { Channel } from 'pusher-js'; function App() { const transakOrderId: string = 'TRANSAK_ORDER_ID'; // Replace with your Transak Order ID useEffect(() => { const pusher: Pusher = new Pusher('1d9ffac87de599c61283', { cluster: 'ap2', }); const orderChannel: Channel = pusher.subscribe(transakOrderId); orderChannel.bind('ORDER_COMPLETED', (data: any) => { console.log(`${transakOrderId} ORDER_COMPLETED:`, data); }); return () => { orderChannel.unbind_all(); pusher.unsubscribe(transakOrderId); pusher.disconnect(); }; }, []); return
{/* Your UI */}
; } export default App; ``` ```javascript import { useEffect } from 'react'; import Pusher, { Channel } from 'pusher-js'; function App() { const apiKey: string = 'YOUR_API_KEY'; // Replace with your API Key const partnerOrderId: string = 'PARTNER_ORDER_ID'; // Replace with your Partner Order ID useEffect(() => { const pusher: Pusher = new Pusher('1d9ffac87de599c61283', { cluster: 'ap2', }); const channelName = `${apiKey}_${partnerOrderId}`; const partnerOrderChannel: Channel = pusher.subscribe(channelName); partnerOrderChannel.bind_global((eventId: string, orderData: any) => { if (eventId !== 'pusher:subscription_succeeded') { console.log(`${partnerOrderId} ${eventId}:`, orderData); } }); return () => { partnerOrderChannel.unbind_all(); pusher.unsubscribe(channelName); pusher.disconnect(); }; }, []); return
{/* Your UI */}
; } export default App; ``` ```javascript import { useEffect } from 'react'; import Pusher, { Channel } from 'pusher-js'; import { jwtDecode } from 'jwt-decode'; function App() { const partnerApiKey: string = 'YOUR_API_KEY'; // Replace with your API Key useEffect(() => { const pusher: Pusher = new Pusher('1d9ffac87de599c61283', { cluster: 'ap2', }); const allOrdersChannel: Channel = pusher.subscribe(partnerApiKey); allOrdersChannel.bind_global((event: string, data: any) => { if (event !== 'pusher:subscription_succeeded') { try { const decoded = jwtDecode(data); console.log(`[allOrders] ${event} Decoded:`, decoded); } catch (err) { console.warn('Failed to decode JWT. Using raw data.', err); } } }); return () => { allOrdersChannel.unbind_all(); pusher.unsubscribe(partnerApiKey); pusher.disconnect(); }; }, []); return
; } export default App; ``` ```bash npm install pusher-js ``` ```javascript const Pusher = require('pusher-js'); const orderId = 'TRANSAK_ORDER_ID'; // Replace with your Transak Order ID const pusher = new Pusher('1d9ffac87de599c61283', { cluster: 'ap2' }); const orderChannel = pusher.subscribe(orderId); orderChannel.bind('ORDER_COMPLETED', (data) => { console.log(`${orderId} ORDER_COMPLETED:`, data); }); ``` ```javascript const Pusher = require('pusher-js'); const apiKey = 'YOUR_API_KEY'; // Replace with your API Key const partnerOrderId = 'PARTNER_ORDER_ID'; // Replace with your Partner Order ID const channelName = `${apiKey}_${partnerOrderId}`; const pusher = new Pusher('1d9ffac87de599c61283', { cluster: 'ap2' }); const partnerOrderChannel = pusher.subscribe(channelName); partnerOrderChannel.bind_global((eventId, data) => { if (eventId !== 'pusher:subscription_succeeded') { console.log(`${partnerOrderId} ${eventId}:`, data); } }); ``` ```javascript const Pusher = require('pusher-js'); const jwt = require('jsonwebtoken'); const apiKey = 'YOUR_API_KEY'; // Replace with your API Key const accessToken = 'ACCESS_TOKEN'; // Replace with your Access Token const pusher = new Pusher('1d9ffac87de599c61283', { cluster: 'ap2' }); const allOrdersChannel = pusher.subscribe(apiKey); allOrdersChannel.bind_global((eventId, encryptedData) => { if (eventId !== 'pusher:subscription_succeeded') { try { const decoded = jwt.verify(encryptedData, accessToken); console.log(`${apiKey} ${eventId} Decoded:`, decoded); } catch (err) { console.warn('Failed to decode JWT:', err); } } }); ``` Add Pusher script to your HTML ``: ```html ``` ```html Transak WebSocket – Order ID ``` ```html Transak WebSocket – Partner Order ID ``` ```html Transak WebSocket – All Orders ``` Follow the official Pusher guides for your mobile platform: Set up Pusher Channels in your Android app using the Java SDK. Set up Pusher Channels in your iOS app using the Swift SDK. Set up Pusher Channels in your Flutter app for cross-platform support. *** ### Sample Response A typical event payload received on any channel looks like this: ```json { "event": "ORDER_CREATED", "data": { "id": "aa39d8e1-…-ce7f", "walletAddress": "0xD902…BEFeE", "createdAt": "2025-04-04T13:11:47.260Z", "status": "AWAITING_PAYMENT_FROM_USER", "fiatCurrency": "EUR", "userId": "243a8ce2-…-b19a3", "cryptoCurrency": "ETH", "isBuyOrSell": "BUY", "fiatAmount": 30, "ipAddress": "14.142.***.***", "amountPaid": 0, "paymentOptionId": "sepa_bank_transfer", "walletLink": "https://sepolia.etherscan.io/address/0xD902…BEFeE", "quoteId": "9291a8bc-…-04e85", "orderProcessingType": "NORMAL", "addressAdditionalData": false, "network": "ethereum", "conversionPrice": 0.0006130127560164107, "cryptoAmount": 0.01759347, "totalFeeInFiat": 1.3, "fiatAmountInUsd": 33.05, "countryCode": "IN", "partnerOrderId": "partner-order-id", "stateCode": "Karnataka", "orderChannelType": "WIDGET", "tokenContractAddress": "0x0000…0000", "userKycType": "STANDARD", "updatedAt": "2025-04-04T13:11:48.374Z", "cardPaymentData": {}, "conversionPriceData": {}, "partnerFeeInLocalCurrency": 0.3, "statusHistories": [] } } ``` # On Ramp **Transak On-Ramp** lets partner apps enable users to buy crypto directly within their own interface using fiat currencies via cards, bank transfers, and local payment methods. ## Problem Statement Onboarding new users to web3 remains fragmented: most decentralised apps lose first‑time users because buying crypto requires complicated wallets, hard‑to‑grasp concepts, and constant switching between apps. Here are some of the **key characteristics** of today’s **major challenge** in the web3 onboarding journey:
High drop‑off Most new users abandon the flow before they ever complete a crypto purchase.
Wallet confusion Users don't understand wallets, gas fees, or public/private keys.
App switching Users must leave the dApp to buy crypto on an exchange, then come back.
Heavy jargon Technical terminology overwhelms non‑crypto‑native users.
## Our Solution Transak On-Ramp lets partner apps enable simple fiat‑to‑crypto, so users can buy crypto instantly using local payment methods without ever leaving the app. Here are some of the **key characteristics** of the Transak On-Ramp solution: Support for Cards, Bank transfers, Apple/Google Pay and local payment methods in multiple fiat currencies. Users can buy crypto without switching apps across 136+ currencies in 45+ blockchains. Built‑in compliance, KYC/AML, and risk controls handled by Transak. Transak provides **enterprise‑grade security**, with ISO 27001 and SOC 2 compliance for product, data, network, and application security ## How does it work? fern-docs-on-ramp ## How to integrate? Integrate our APIs in your backend to build a fully custom UI and user journey. Redirect users to Transak's hosted flow via the Web to complete their fiat-to-crypto purchase. Add the Transak Embed to your web app using an iframe. Add the Transak Embed to your JavaScript app with our SDK. Add the Transak Embed to your Android app. Add the Transak Embed to your iOS app. Add the Transak Embed to your React Native app. # Off-Ramp **
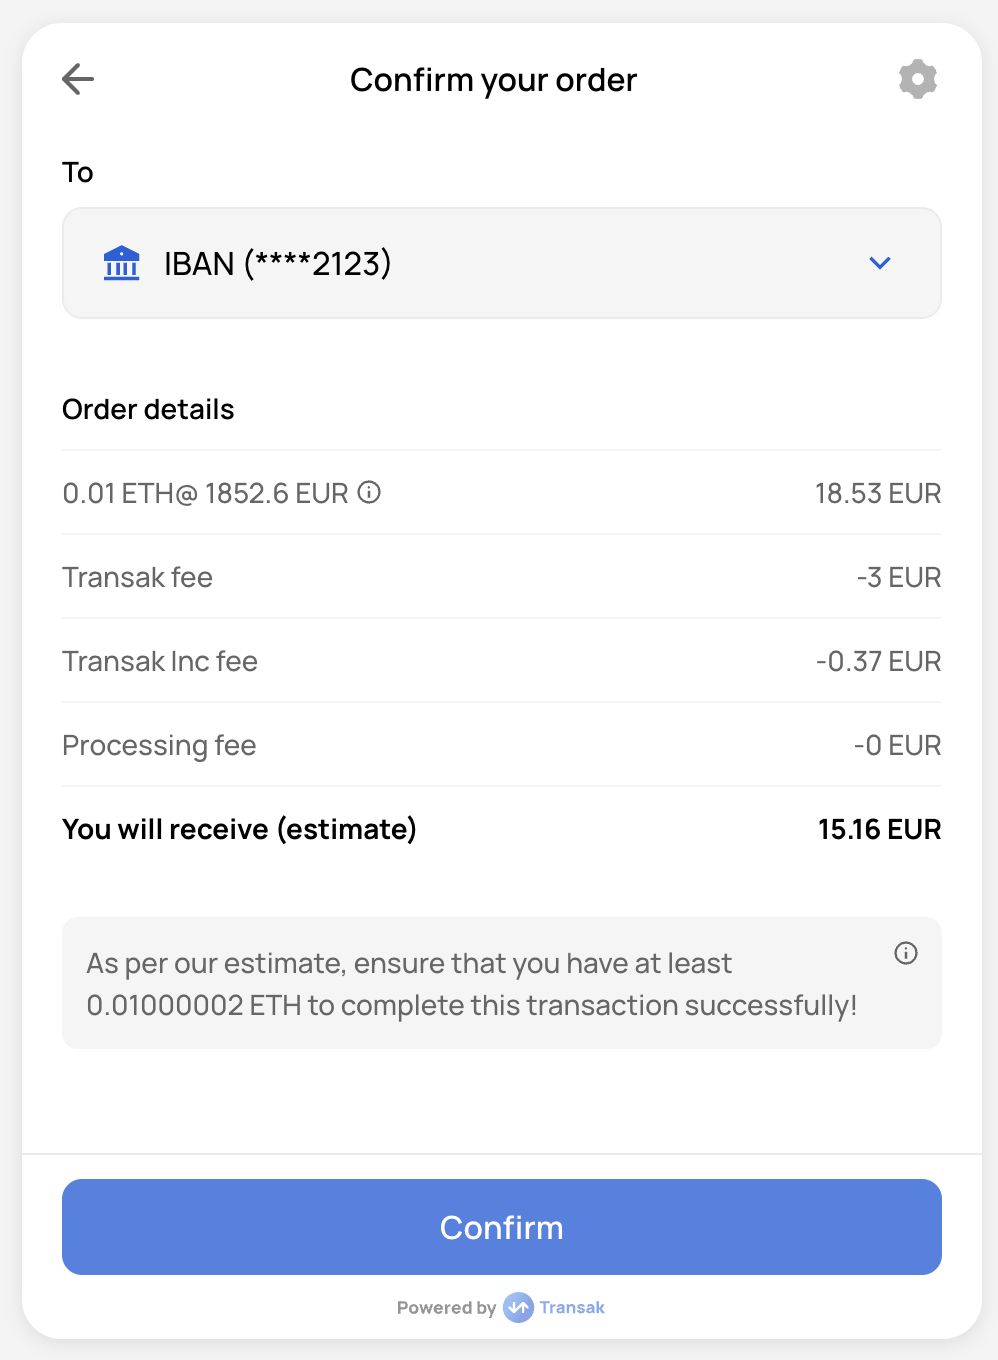
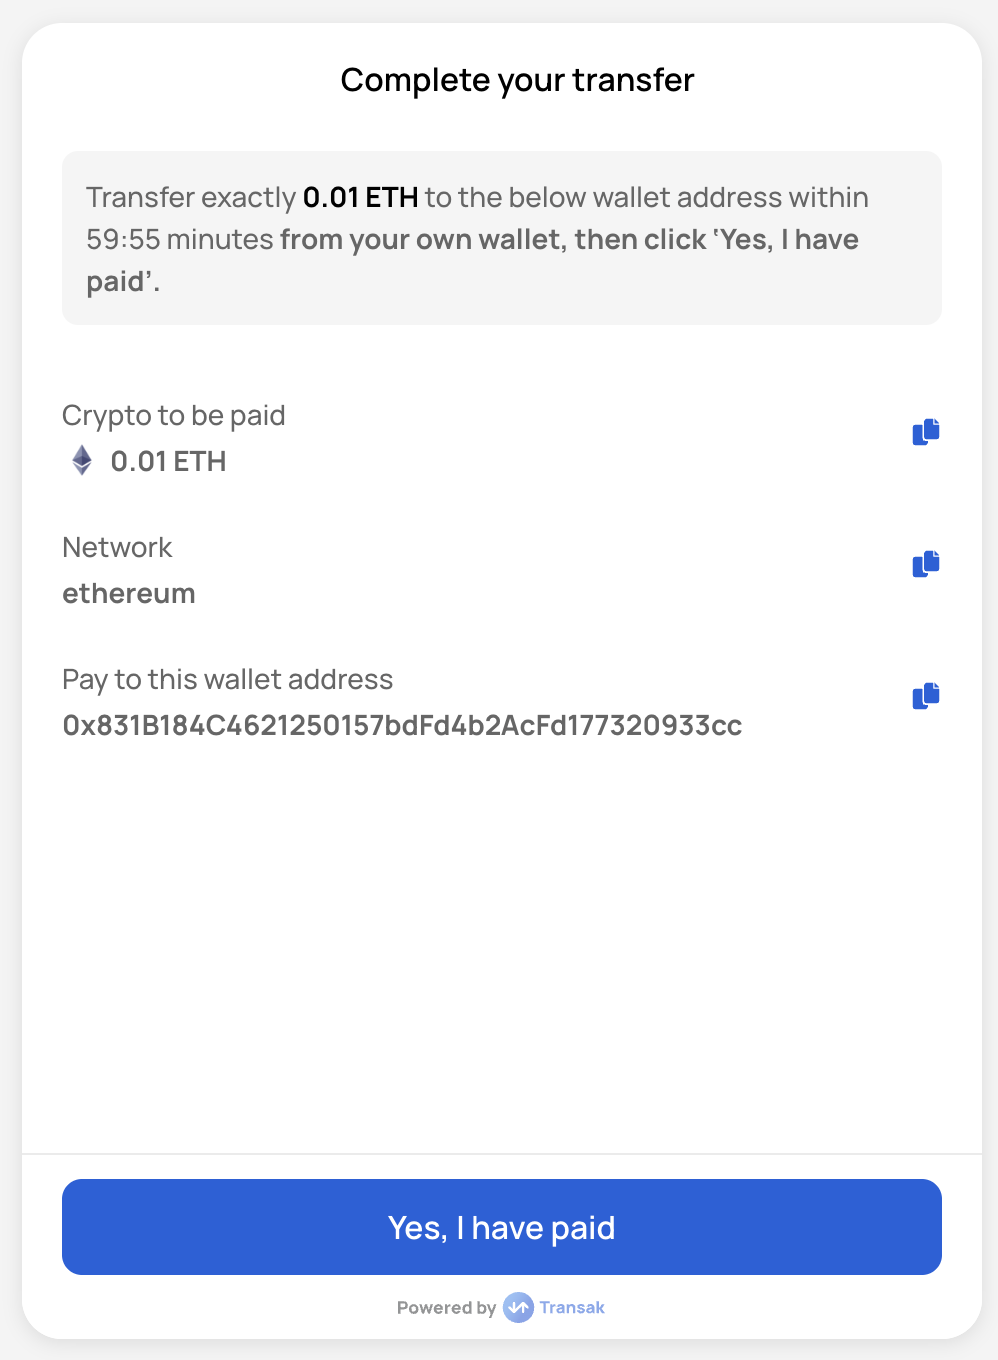
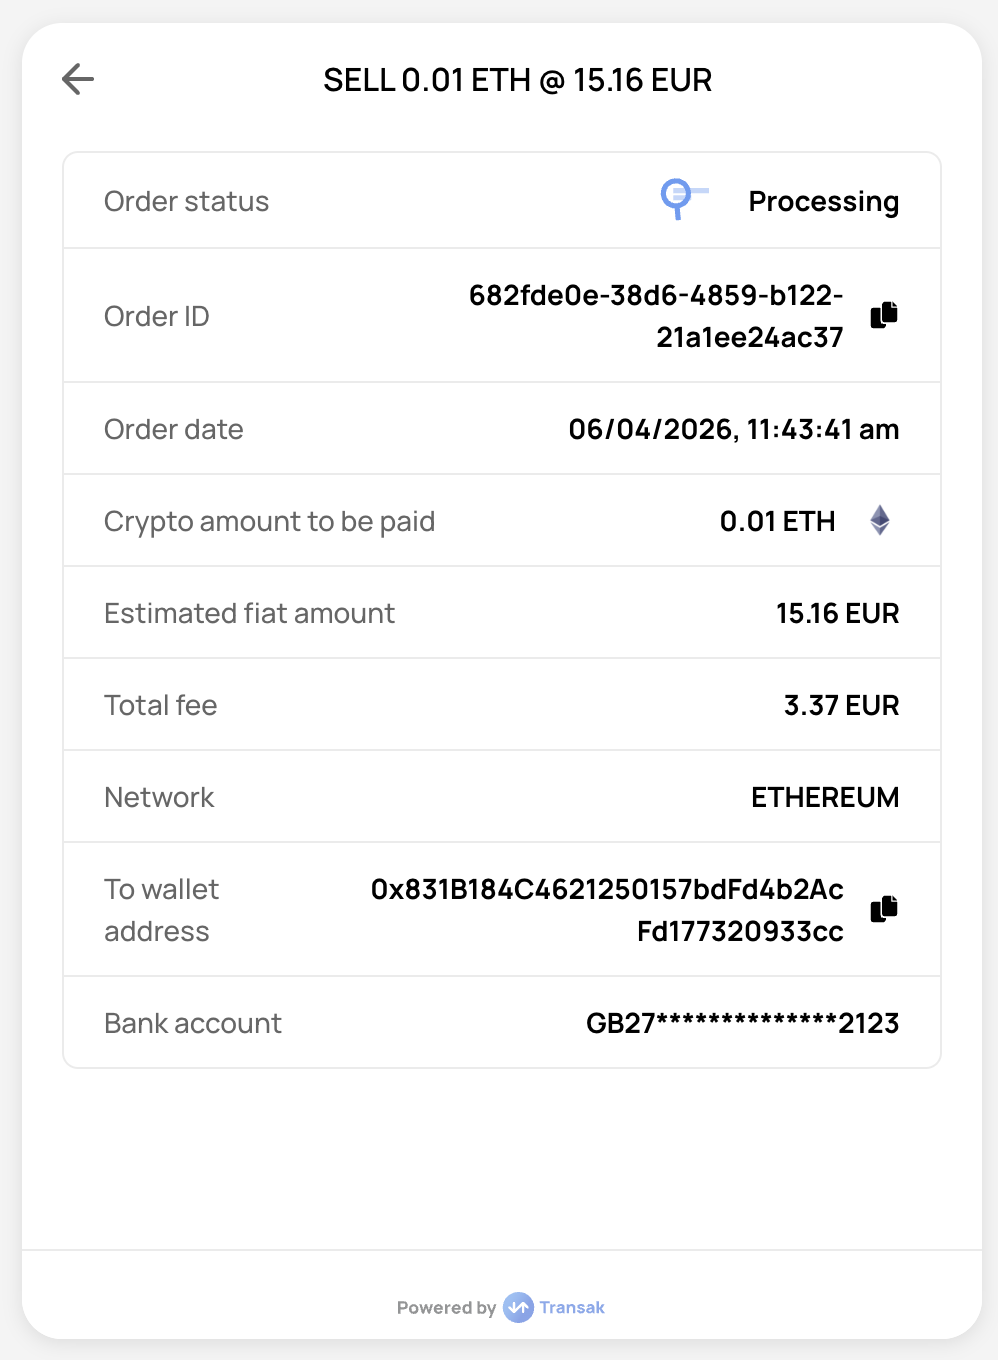
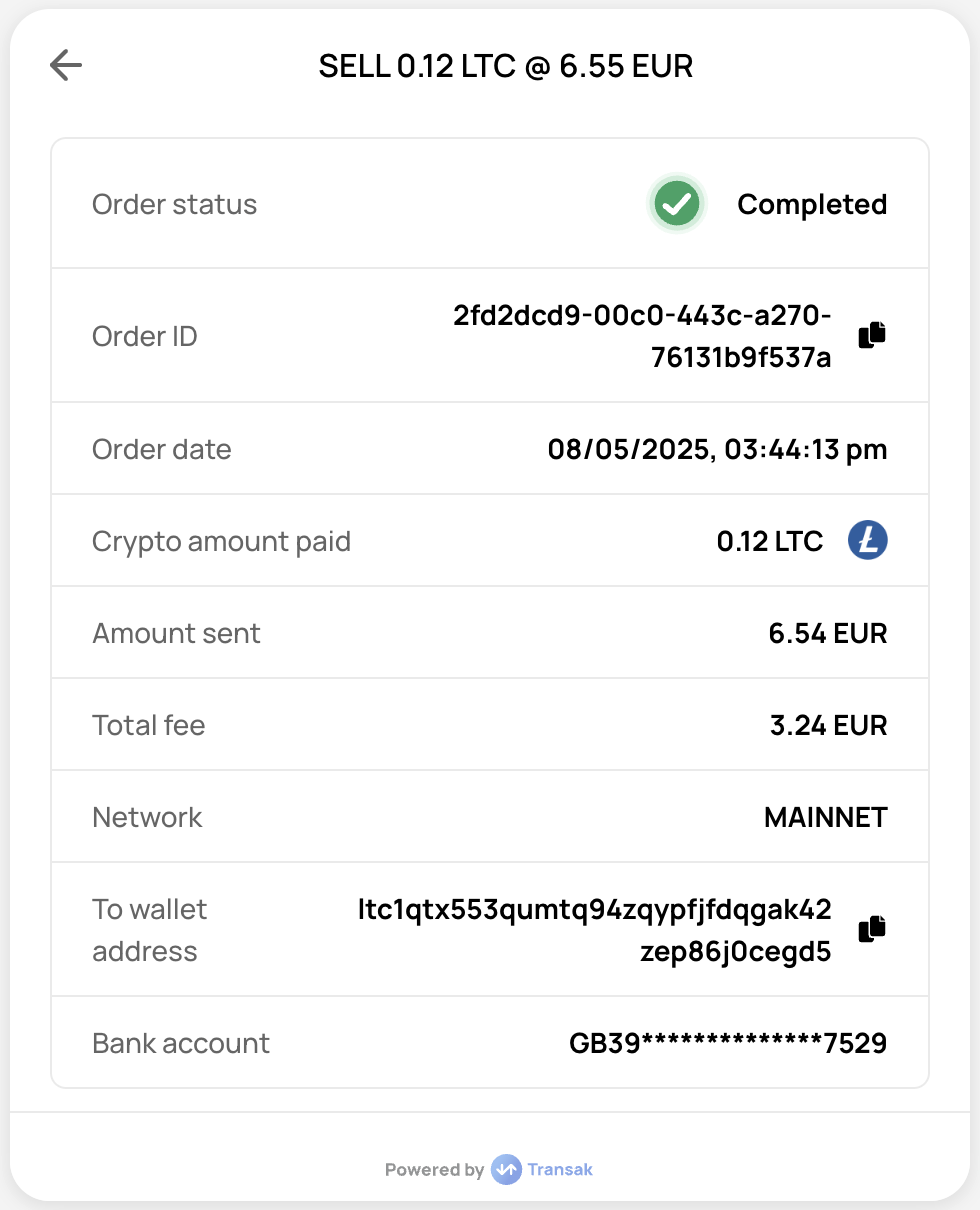
Transak Off-Ramp** lets partner apps enable users to sell crypto directly within their own interface and receive fiat in their local bank account via different payout methods. ## Problem Statement Off-ramping crypto to fiat remains fragmented: most dApps lose users because selling crypto requires understanding swaps and bridges, paying multiple fees, and constantly switching between platforms. Here are some of the **key characteristics** of today's **major challenge** in the crypto off-ramp journey:
High drop‑off Most users abandon the off-ramp flow due to the complexity of swapping and bridging assets.
Multiple fees Gas fees for every swap plus bridging fees make the off-ramp journey expensive.
App switching Users must leave the dApp to sell crypto on an exchange.
Heavy jargon Technical terminology overwhelms non‑crypto‑native users.
## Our Solution Transak Off-Ramp lets partner apps enable simple crypto-to-fiat, so users can sell crypto and receive fiat in their local currency without swapping, bridging, or leaving the app. Here are some of the **key characteristics** of the Transak Off-Ramp solution: Support for Cards, Bank transfers and Apple/Google Pay in multiple fiat currencies. Users can sell crypto without switching apps across 136+ currencies in 45+ blockchains. Built‑in compliance, KYC/AML, and risk controls handled by Transak. Transak provides **enterprise‑grade security**, with ISO 27001 and SOC 2 compliance for product, data, network, and application security ## How does it work? ## Who can integrate?
DeFi Apps Enable users to easily exit positions and convert crypto earnings to fiat.
Wallets Provide in-app off-ramp functionality for users to cash out their holdings.
Crypto Games Let players convert in-game crypto rewards to real-world currency.
DEXes Offer complete liquidity cycle: buy, trade, and cash out to fiat.
NFT dApps Enable creators and collectors to convert NFT sales proceeds directly to fiat.
Neo-Banks & Protocols Integrate fiat off-ramps for crypto-native financial services and institutional platforms.
## How to integrate? ### Enable Off-Ramp Go to [dashboard.transak.com](https://dashboard.transak.com) and log in to your account. Go to **Products Tab** → **Sell** Enable Sell and set the Fee Percentage. Click Update to save changes. ### Integration Options Redirect users to Transak's hosted flow via the Web to complete their crypto-to-fiat sale. Add the Transak Embed to your web app using an iframe. Add the Transak Embed to your JavaScript app with our SDK. Add the Transak Embed to your Android app. Add the Transak Embed to your iOS app. Add the Transak Embed to your React Native app. Redirection Checklist # NFT Checkout **Transak NFT Checkout** lets partner apps enable users to buy or mint NFT within their own interface using fiat currencies via different payment methods. ## Problem Statement Buying NFTs with fiat remains a multi-step challenge: most marketplaces lose buyers because purchasing NFTs requires buying crypto separately, understanding gas tokens and approvals, and executing multiple complex transactions. Here are some of the **key characteristics** of today’s **major challenge** in the web3 onboarding journey:
High drop-off Most users abandon the flow before completing their NFT purchase due to the multiple steps required.
Multiple fees Users pay gas fees for crypto purchase, token approvals, and the final NFT transaction.
App switching Users must leave the marketplace to buy crypto on an exchange, then come back to complete the purchase.
Technical complexity Understanding gas tokens, approvals, and transaction signing overwhelms non‑crypto‑native users.
## Our Solution Transak NFT Checkout lets partner marketplaces enable simple fiat‑to‑NFT purchases, so users can buy NFTs instantly using local payment methods without buying crypto, executing approvals, or leaving the platform. Here are some of the **key characteristics** of the Transak NFT Checkout solution: Support for Cards, Apple/Google Pay in multiple fiat currencies. Users can buy NFT without switching apps across 136+ currencies in EVM-compatible blockchains. Built‑in compliance, KYC/AML, and risk controls handled by Transak. Transak provides **enterprise‑grade security**, with ISO 27001 and SOC 2 compliance for product, data, network, and application security ## How does it work? You pass the NFT details to Transak to fulfill the transaction through [query parameters](/customization/query-parameters/nft-checkout). User clicks on "Buy with Fiat" on your platform. First-time users complete our simple one-time KYC verification. User completes the fiat payment through their preferred payment method. Behind the scenes, Transak executes your marketplace smart contract based on the calldata you provided and sends the NFT directly to the user's wallet. ## Who can integrate? Users can still pay directly with their wallet, while Transak enables additional options like credit card payments to improve conversion rates.
Individual Collections Perfect for single NFT collections looking to enable fiat purchases.
Agencies & Launchpads No-code solutions and agencies managing multiple NFT projects.
Marketplaces Multi-collection marketplaces for primary and secondary sales.
Enterprises Gaming, loyalty programs, memberships, and subscription services.
## Why Transak?
Feature Transak Other Competitors
Multiple mints Unlimited Max 5
Cryptocurrency support Any token supported Only native token or USDC
Smart contract requirements Any custom contract Your contract must accept buyer's wallet address
Transaction limits Min \$0.01 Min $3 - $5
Smart contract supported Self-serve for any custom contract Limited types of contract
Chargeback protection Yes Yes

Blockchains Supported Ethereum, Polygon, Arbitrum, Optimism, Base, BSC, Cronos, Immutable zkEVM, and all EVM-compatible chains.
Pricing No fees charged to partner or business. Network and Processing fees are charged directly to the buyer of the NFT.
NFT Standards Supported Supports ERC-721, ERC-721A, and ERC-1155 compliant collections for primary and secondary sales.
Contract Types Supported Any custom smart contract on EVM chains — just provide the calldata for execution.
We recommend verifying your smart contract on the respective blockchain explorer (Etherscan, Polygonscan, etc.) for faster review and approval. ## How to integrate? ### Whitelist Smart Contract Go to [dashboard.transak.com](https://dashboard.transak.com) and log in to your account. Go to **Products Tab** → **NFT Checkout** Provide your smart contract address, network, and other required information. **Staging:** Smart contract whitelisted automatically within 1 minute.\ **Production:** We review your smart contract audit report and approve or reject within 1 day. ### Integration Options Redirect users to Transak's hosted flow via the Web to complete their fiat-to-NFT purchase. Add the Transak Embed to your web app using an iframe. Add the Transak Embed to your JavaScript app with our SDK. Add the Transak Embed to your Android app. Add the Transak Embed to your iOS app. Add the Transak Embed to your React Native app. ### Transak Smart Contract Addresses When generating calldata, use Transak's contract address (below) if your function requires a recipient wallet parameter. NFTs are minted to our contract first, then automatically transferred to the buyer's wallet. | Blockchain | Address | | ----------------------- | ---------------------------------------------------------------------------------------------------------------------------------- | | **Ethereum** | [`0xab88cd272863b197b48762ea283f24a13f6586dd`](https://etherscan.io/address/0xab88cd272863b197b48762ea283f24a13f6586dd) | | **Polygon** | [`0x4A598B7eC77b1562AD0dF7dc64a162695cE4c78A`](https://polygonscan.com/address/0x4A598B7eC77b1562AD0dF7dc64a162695cE4c78A) | | **Binance Smart Chain** | [`0x4A598B7eC77b1562AD0dF7dc64a162695cE4c78A`](https://bscscan.com/address/0x4A598B7eC77b1562AD0dF7dc64a162695cE4c78A) | | **Arbitrum** | [`0x4A598B7eC77b1562AD0dF7dc64a162695cE4c78A`](https://arbiscan.io/address/0x4a598b7ec77b1562ad0df7dc64a162695ce4c78a) | | **Optimism** | [`0x4A598B7eC77b1562AD0dF7dc64a162695cE4c78A`](https://optimistic.etherscan.io/address/0x4a598b7ec77b1562ad0df7dc64a162695ce4c78a) | | **Immutable zkEVM** | [`0x8b83dE7B20059864C479640CC33426935DC5F85b`](https://explorer.immutable.com/address/0x8b83dE7B20059864C479640CC33426935DC5F85b) | | **Cronos** | [`0xAb88cd272863b197B48762EA283f24a13f6586Dd`](https://cronoscan.com/address/0xAb88cd272863b197B48762EA283f24a13f6586Dd) | | **Base** | [`0x8b83dE7B20059864C479640CC33426935DC5F85b`](https://base.blockscout.com/address/0x8b83dE7B20059864C479640CC33426935DC5F85b) | | **Ronin** | [`0x7b2d268eea7f99520f7e968052fac76f52c73c7e`](https://app.roninchain.com/address/0x7b2d268eea7f99520f7e968052fac76f52c73c7e) | | Blockchain | Testnet Name | Address | | ----------------------- | ------------ | ------------------------------------------------------------------------------------------------------------------------------------------ | | **Ethereum** | Sepolia | [`0xD84aC4716A082B1F7eCDe9301aA91A7c4B62ECd7`](https://sepolia.etherscan.io/address/0xd84ac4716a082b1f7ecde9301aa91a7c4b62ecd7) | | **Polygon** | Amoy | [`0xCB9bD5aCD627e8FcCf9EB8d4ba72AEb1Cd8Ff5EF`](https://amoy.polygonscan.com/address/0xcb9bd5acd627e8fccf9eb8d4ba72aeb1cd8ff5ef) | | **Binance Smart Chain** | BSC Testnet | [`0x0E9539455944BE8a307bc43B0a046613a1aD6732`](https://testnet.bscscan.com/address/0x0E9539455944BE8a307bc43B0a046613a1aD6732) | | **Arbitrum** | Sepolia | [`0x489F56e3144FF03A887305839bBCD20FF767d3d1`](https://sepolia.arbiscan.io/address/0x489f56e3144ff03a887305839bbcd20ff767d3d1) | | **Optimism** | Sepolia | [`0xCB9bD5aCD627e8FcCf9EB8d4ba72AEb1Cd8Ff5EF`](https://optimism-sepolia.blockscout.com/address/0xCB9bD5aCD627e8FcCf9EB8d4ba72AEb1Cd8Ff5EF) | | **Immutable zkEVM** | Testnet | [`0x489F56e3144FF03A887305839bBCD20FF767d3d1`](https://explorer.testnet.immutable.com/address/0x489F56e3144FF03A887305839bBCD20FF767d3d1) | | **Cronos** | Testnet | [`0xcb9bd5acd627e8fccf9eb8d4ba72aeb1cd8ff5ef`](https://explorer.cronos.org/testnet/address/0xcb9bd5acd627e8fccf9eb8d4ba72aeb1cd8ff5ef) | | **Base** | Sepolia | [`0xCB9bD5aCD627e8FcCf9EB8d4ba72AEb1Cd8Ff5EF`](https://base-sepolia.blockscout.com/address/0xCB9bD5aCD627e8FcCf9EB8d4ba72AEb1Cd8Ff5EF) | | **Ronin** | Saigon | [`0x3aceeeff77fd365002da74b0cce1e5c4e263d4c0`](https://saigon-app.roninchain.com/address/0x3aceeeff77fd365002da74b0cce1e5c4e263d4c0) | ### FAQs No, you can have both ERC-721 and ERC-1155 in the same transaction. **Note:** Supported for primary & secondary sales but only if the smart contract address to mint/buy both type of NFTs is the same. No, currently Transak allows buyers to only buy multiple NFTs of the same collection. Yes. All NFTs in a transaction need to be part of the same blockchain. We don't have any limits. It is only limited by the gas limit of the blockchain. We refund the user the entire amount. No NFT will be minted from your smart contract, preserving the NFT and its provenance. ## Ready to integrate? Get in touch at [**sales@transak.com**](mailto:sales@transak.com) to discuss integration and go-live timelines. # Whitelabel API The **Transak Whitelabel API** enables partners to integrate Transak products directly into their own platforms using APIs, without displaying any **third-party user interface** (such as the Transak Widget).Partners maintain complete control over the **user interface and end-to-end user journey**, while Transak manages the backend complexities through APIs, including KYC, compliance, liquidity, payment processing, and fraud management.## Who Should Use This?This solution is ideal for partners who want to fully own and control the **E2E user journey**, **including the user interface, experience, and flow**.
Wallets Integrate fiat on/off-ramps directly into wallet interfaces for seamless user experience.
DEXs or CEXs Enable users to buy and sell crypto within your exchange platform using fiat.
DApps Add fiat payment options to decentralized applications for broader user accessibility.
Fintech Apps Power remittances, neobanks, and cross-border payment solutions with crypto rails.
## Key CapabilitiesBuild and control the complete user journey, from authentication and KYC to order creation and tracking, without any third-party UI.Access 136+ cryptocurrencies across 45+ blockchains in 64+ countries with transparent pricing via Lookup APIs.Create and track orders programmatically using REST APIs, Webhooks, and WebSockets.Transak handles KYC, AML, transaction monitoring, and regulatory compliance.Reuse your existing KYC data with Transak through Sumsub for faster onboarding.## Partner Integration PrerequisitesFollow the steps in the [Need help in Integration](/getting-started/help-and-support#need-help-in-integration) section to reach us. Then raise the request to enable **Whitelabel APIs** for your API key and share your public IP addresses with Transak for whitelisting to use our APIs in your backend.Start by designing and implementing the complete user flow, including error handling. See the [Lookup API reference](/api/whitelabel/lookup/get-countries) to begin.You must include [Transak's Terms of Service](https://transak.com/terms-of-service) within their own Terms & Conditions. End users must be able to review and acknowledge Transak's T\&C as part of the user journey.## Current Limitations & Known Constraints
Product Supported Limitations
On Ramp Yes Card / Apple Pay: Semi-widget flow required. Navigate to Transak's Widget to add cards and place orders.

Google Pay: Not supported.

Bank Transfers: Fully supported through APIs.

Lite KYC: Fully supported through APIs (Personal & Address details).

Standard KYC: Navigate to Transak's provider widget to upload Document ID Proof and conduct Liveness checks.
Off Ramp No NA
NFT Checkout No NA
KYC Reliance Via Sumsub Yes Not supported for US KYC users
Transak Stream - Off Ramp No NA
Transak Stream - On Ramp No NA
Whitelabel APIs are to be called only from the partner backend and subjected to the whitelisting of partner IP addresses. Direct API calls from the frontend apps are not supported.## API OverviewLookup APIs provide public reference data that you can use before initiating a session. Use them to populate currency selectors, validate supported regions, and fetch real-time quotes — no authentication required.Returns a list of supported crypto assets with network and symbol details.Returns all supported fiat currencies along with their default locale mappings.Returns supported countries and any applicable regional restrictions.Returns a real-time quote with the expected amount and fee breakdown.Fetch all required data before presenting the order form.Fetch supported fiat currencies and payment methods.Fetch available crypto assets and networks.Pass values from the steps above to get a real-time quote.Pass the existing **User Access Token** to Get User Details to fetch the user's KYC status. Route the user as follows:
Condition Next step
response = 200 and data.kyc.status === "APPROVED" Proceed to Create Order — Bank Transfer, Create Order — Cards, or Create Order — Apple Pay flow
response = 200 and data.kyc.status === "NOT\_SUBMITTED" Proceed to KYC Flow
response = 200 and data.kyc.status === "ADDITIONAL\_FORMS\_REQUIRED" Proceed to Additional KYC Flow
response = 401 Proceed to Not Logged In Flow — the User Access Token is missing, expired, or invalid. Re-authenticate using the Not Logged In Flow tab (Send User OTP → Verify User OTP).
Fetch all required data before presenting the order form.Fetch supported fiat currencies and payment methods.Fetch available crypto assets and networks.Pass values from the steps above to get a real-time quote.Call Send User OTP with the user's **email address**.Transak sends a one-time password to the user's inbox.Call Verify User OTP with the following parameters:
The user's email address The one-time password from the user's inbox Returned in the Send User OTP response
On success, store `data.accessToken` — this is the **User Access Token** required for all subsequent authenticated API calls.Pass the **User Access Token** to Get User Details → fetch the user's KYC status.
Condition Next step
data.kyc.status === "APPROVED" Proceed to Create Order (Bank Transfer / Cards / Apple Pay Flow)
data.kyc.status === "NOT_SUBMITTED" Proceed to KYC Flow
data.kyc.status === "ADDITIONAL_FORMS_REQUIRED" Proceed to Additional KYC Flow
This document provides a detailed explanation of KYC flows, covering Simple KYC, Standard KYC and Enhanced KYC, along with the required API interactions and processes. KYC is a mandatory step in compliance with regulatory requirements before users can place orders on Transak.### KYC FlowChart| **KYC Type** | **Requirements** | | ---------------- | --------------------------------------------------------------------------------------------------------------------------------------------- | | **Simple KYC** | Personal Details, Address Details, SSN (for US users only) | | **Standard KYC** | Personal Details, Address Details, SSN (for US users only), ID Proof Upload, Liveness Check (Selfie) | | **Enhanced KYC** | Personal Details, Address Details, SSN (for US users only), Source of Income, Proof Document Upload, ID Proof Upload, Liveness Check (Selfie) |### Fetch KYC Requirement Based on Quote IDThe **KYC requirements** are determined dynamically using the quote ID. Transak supports multi-level KYC, meaning different users may have different requirements based on country, regulations, and transaction limits.When fetching **KYC Requirement, there can be three status** -| **KYC Status** | **Description** | | --------------------------- | ------------------------------------------------------------------------------------------------------ | | APPROVED | KYC is done and approved by Transak. User can proceed with the order creation flow. | | SUBMITTED | KYC personal and address details or additional forms are submitted. | | NOT\_SUBMITTED | KYC personal and address details are not submitted. | | ADDITIONAL\_FORMS\_REQUIRED | All details are submitted but some more additional requirements need to be fulfilled for KYC approval. |- **Personal Details** → First name, last name, email, and mobile number. - **Address Details** → User's residential details (address, city, state, zip code). - **Purpose of Usage** → Used for compliance with regulations. - **ID Proof** → Required only if **Standard or Enhanced KYC** is needed. - **SSN** → Required only for **US KYC** users. - **Source of Income** → Required only if **Enhanced KYC** is needed. - **Proof Document** → Required only if **Enhanced KYC** is needed.All forms must be submitted in the sequence provided in the **Get Additional Requirements** API.### KYC Flow - Step-by-Step GuideUse this step to fetch the current status of the user's KYC, based on the `quoteId`.Call Get KYC Requirement with the `quoteId` (and the **User Access Token** as required by the API).
Condition Next step
data.kyc.status = APPROVED Move forward with the Create Order Flow
data.kyc.status = NOT\_SUBMITTED Follow Step 2
data.kyc.status = ADDITIONAL\_FORMS\_REQUIRED Follow Step 3
Call Patch User Details to collect and submit the user's profile and address information.**Personal Information**
User's first name User's last name Mobile number with country code Date of birth (ISO 8601)
**Address Information**
Street address City State or province Postal or zip code Country code (ISO 3166-1 alpha-2)
Once submitted, return to **Step 1** to re-fetch the updated KYC status.Call Get Additional Requirements to check which forms still need to be completed.Check if additional information must be provided for KYC Approval. Multiple forms may appear and must be submitted **in the sequence provided** in the API response:1) If `type = PURPOSE_OF_USAGE` → Follow **Step 4** 2) If `type = IDPROOF` → Follow **Step 5** 3) If `type = US_SSN` → Follow **Step 6** 4) If `type = SOURCE_OF_INCOME` → Follow **Step 7** 5) If `type = DOCUMENT_PROOF` → Follow **Step 8**Call Update Purpose of Usage to record the user's reason for buying crypto.Ask user for their reason to buy crypto (e.g., investing, remittance).Standard KYC onlyRedirect the user to the Transak-hosted KYC widget using the `kycUrl` returned in the Additional Requirements response.
Upload a photo ID — Passport, Driver's License, or National ID Submit a selfie for real-time identity validation
This step is handled by the Transak KYC widget. Use the `kycUrl` from the previous API response to redirect the user.US users onlyCall Submit SSN to validate the user's identity using their Social Security Number.
9-digit Social Security Number
SSN must be submitted before a virtual bank account can be created for the user.Enhanced KYC onlyCall Submit Source of Income to capture the user's primary income source. Required for higher transaction limits.
Accepted values: `SALARY`, `BUSINESS`, `INVESTMENTS`, `SAVINGS`
Enhanced KYC onlyCall Upload Proof Document to submit supporting documentation for the income source selected in the previous step.The required document type is determined by the source of income submitted in Step 7.### Different KYC Levels Guide| KYC Type | KYC Status | User Status | Action | | ---------- | -------------- | ----------- | -------------------------------------------------------------------------------------------------------------------------------------------------------------------------- | | `null` | NOT\_SUBMITTED | ACTIVE | Call **GET KYC Requirement API** → Complete KYC Forms | | `SIMPLE` | SUBMITTED | ACTIVE | Poll **GET User Details API** | | `SIMPLE` | APPROVED | ACTIVE | Call **GET KYC Requirement API** → If `APPROVED` place order → If `ADDITIONAL_FORMS_REQUIRED` call Get Additional Requirements API → If `NOT_SUBMITTED` patch user details | | `SIMPLE` | REJECTED | ACTIVE | Call **GET KYC Requirement API** → If `ADDITIONAL_FORMS_REQUIRED` call Get Additional Requirements API → If `NOT_SUBMITTED` patch user details | | `STANDARD` | SUBMITTED | ACTIVE | Poll **GET User Details API** | | `STANDARD` | APPROVED | ACTIVE | Call **GET KYC Requirement API** → If `APPROVED` place order → If `ADDITIONAL_FORMS_REQUIRED` call Get Additional Requirements API | | `STANDARD` | REJECTED | ACTIVE | Call **GET KYC Requirement API** → If `APPROVED` place order → If `ADDITIONAL_FORMS_REQUIRED` call Get Additional Requirements API → If `NOT_SUBMITTED` patch user details | | `STANDARD` | REJECTED | DISABLED | Show static screen — Contact Support | | `ENHANCED` | SUBMITTED | ACTIVE | Poll **GET User Details API** | | `ENHANCED` | APPROVED | ACTIVE | Call **GET KYC Requirement API** → If `APPROVED` place order | | `ENHANCED` | REJECTED | ACTIVE | Call **GET KYC Requirement API** → If `APPROVED` place order → If `ADDITIONAL_FORMS_REQUIRED` call Get Additional Requirements API → If `NOT_SUBMITTED` patch user details | | `ENHANCED` | REJECTED | DISABLED | Show static screen — Contact Support |### API SequenceCall Get KYC Reliance Quote with `kycShareTokenProvider` and `kycShareToken` alongside the common fields used in the standard Get Quote API.On success, you will receive a `quoteId` to use in the next step.Call Get KYC Reliance Status with the `quoteId` and `kycShareToken` to fetch the user's KYC status, then route accordingly:
Generate a **new KYC Share Token** and repeat from Step 1. Proceed to **Get KYC Steps**.
### Things to Consider1) KYC Reliance supports only SumSub providers, and more are coming soon. 2) KYC Reliance supports only Standard KYC as the default process, where Document ID and Selfie checks are mandatory. The partners should pass the Document ID and Selfie documents to get the complete whitelabel experience to onboard their users seamlessly as per the steps mentioned in the docs. 3) Purpose Of Purchase is a mandatory step in Transak's KYC system, even for KYC Reliance flows. 4) Refer to the detailed step-by-step guide to generating the KYC Share token using SumSub docs.Call Get KYC Requirement with the `quoteId` to fetch the user's KYC status and route accordingly:
When Next step
data.kyc.status = APPROVED No further steps in the KYC process. Proceed to Get User Limits.
data.kyc.status = NOT\_SUBMITTED User details need to be submitted. Proceed to Patch User Details.
data.kyc.status = ADDITIONAL\_FORMS\_REQUIRED More steps in the KYC process are required. Proceed to Get Additional Requirements.
Call Get User Limits with `paymentMethod = bank_transfer` and `fiatCurrency` to fetch the user's monthly, daily, and yearly limits along with available limits to place an order.On success → proceed to **Get Active Orders**.Call Get Active Orders to check for any existing pending orders. Transak doesn't support placing multiple orders simultaneously.
Proceed to **Cancel Order** Proceed to **Create Order**
Call Create Order passing `quoteId`, `paymentInstrumentId` (payment method), and `walletAddress`.
Proceed to **Confirm Payment** **Cancel Order** → repeat **Get User Limits** **Get Quote** → repeat **Get User Limits**
Call Confirm Payment with `orderId` and `paymentMethod` to confirm the bank transfer.On success → proceed to **Get Order By ID**.Call Cancel Order with `orderId` and `cancelReason` to cancel a pending order.This step is only required when an existing active order is detected. After cancellation, return to **Get User Limits** to start a fresh order.Call Get Order By ID with `orderId` to poll the final order status.This flow enables users to OnRamp using existing or new card details. The flow uses a session ID to initialize a payment widget, enabling a smooth, embedded experience within the partner's UI.Call Get KYC Requirement with the `quoteId` to fetch the KYC status and route accordingly:
When Next step
data.kyc.status = APPROVED No further steps in the KYC process. Proceed to Get User Limits.
data.kyc.status = NOT\_SUBMITTED User details need to be submitted. Proceed to Patch User Details.
data.kyc.status = ADDITIONAL\_FORMS\_REQUIRED More steps in the KYC process are required. Proceed to Get Additional Requirements.
Call Get User Limits with `paymentMethod = credit_debit_card` and `fiatCurrency` to fetch the user's monthly, daily, and yearly limits.On success → proceed to **Get Active Orders**.Call Get Active Orders to check for any existing pending orders. Transak doesn't support placing multiple orders simultaneously.
Proceed to **Cancel Order** Proceed to **Create Widget URL**
Call Create Widget URL by passing the **User Access Token** and **Partner Access Token** to generate a payment `widgetUrl`.Each `widgetUrl` is **single-use only** and **valid for 5 minutes** from the time of creation.Open the Payment Widget using the `widgetUrl` received from the previous step. The widget handles card entry and validation.**Example URL:**``` https://global-stg.transak.com?apiKey=YOUR_API_KEY&sessionId=eyJhbGciOiJIUzI1NiIsInR5cCI6IkpXVCJ9... ```Through the widget, users can enter new card details or use previously saved cards.Card information is submitted via the widget. The backend API securely processes the payment and places the order.After order placement, the order status is delivered in real time via a WebSocket connection. Partners can subscribe to various order status events.Refer to the WebSocket integration docs to listen to order events.This flow enables users to OnRamp using Apple Pay through a session-based payment widget embedded in the partner's UI.Call Get KYC Requirement with the `quoteId` to fetch the KYC status and route accordingly:
When Next step
data.kyc.status = APPROVED No further steps in the KYC process. Proceed to Get User Limits.
data.kyc.status = NOT\_SUBMITTED User details need to be submitted. Proceed to Patch User Details.
data.kyc.status = ADDITIONAL\_FORMS\_REQUIRED More steps in the KYC process are required. Proceed to Get Additional Requirements.
Call Get User Limits with `paymentMethod = apple_pay` and `fiatCurrency` to fetch the user's monthly, daily, and yearly limits.On success → proceed to **Get Active Orders**.Call Get Active Orders to check for any existing pending orders. Transak doesn't support placing multiple orders simultaneously.
Proceed to **Cancel Order** Proceed to **Create Widget URL**
Call Create Widget URL by passing the **User Access Token** and **Partner Access Token** to generate a payment `widgetUrl`.Each `widgetUrl` is **single-use only** and **valid for 5 minutes** from the time of creation.Open the Payment Widget using the `widgetUrl` received from the previous step. The widget handles Apple Pay validation.**Example URL:**``` https://global-stg.transak.com?apiKey=YOUR_API_KEY&sessionId=eyJhbGciOiJIUzI1NiIsInR5cCI6IkpXVCJ9... ```Through the widget, users can authorize payment with Apple Pay if the browser and device configuration support it.Apple Pay authorization is submitted via the widget. The backend API securely processes the payment and places the order.After order placement, the order status is delivered in real time via a WebSocket connection. Partners can subscribe to various order status events.Refer to the WebSocket integration docs to listen to order events.The **Open Banking payment** method allows users in the **EU and UK** to fund crypto purchases via a **secure, real-time bank transfer.**Open Banking is available under the Get Fiat Currencies API with payment method ID referred to as `pm_open_banking` or displayed to users as **Easy Bank Transfer**.This feature is available only for users whose **KYC country is supported** under Plaid's Open Banking framework (e.g., UK, Ireland, Germany, France, etc.). The list of supported countries and banks can be found here.Call Get Fiat Currencies to confirm supported fiat currencies (e.g., EUR/GBP) and verify the availability of `pm_open_banking` as a payment method.Call Get Quote to generate a quote for fiat → crypto using Open Banking as the selected payment method.Call Get KYC Requirement with the `quoteId` (and the **User Access Token** as required by the API) to validate KYC for the provided quote and route accordingly:
When Next step
data.kyc.status = APPROVED No further steps in the KYC process. Proceed to Get User Limits.
data.kyc.status = NOT\_SUBMITTED User details need to be submitted. Proceed to Patch User Details.
data.kyc.status = ADDITIONAL\_FORMS\_REQUIRED More steps in the KYC process are required. Proceed to Get Additional Requirements.
Call Get User Limits to validate the user's daily, monthly, and yearly limits for `pm_open_banking`.Call Get Active Orders to check for any existing pending orders. Transak doesn't support placing multiple orders simultaneously.
Proceed to **Cancel Order** Proceed to **Create Order**
Call Create Order with `quoteId`, `walletAddress`, and `paymentInstrumentId: pm_open_banking`.
The Open Banking authorization URL
The `redirectUrl` must be opened in a webview or browser to launch the Open Banking authorization flow\.Call Cancel Order to cancel a pending order (if still `AWAITING_PAYMENT_FROM_USER`) by providing `orderId` and `cancelReason`.Call Get Order By ID with `orderId` to fetch the final order status. # Redirection The Transak Web Redirection integration allows you to redirect users to Transak's interface with minimal implementation effort. Call the [Create Widget URL](/api/public/create-widget-url) API from your backend to generate a secure widget url using Query parameters Open Transak in a new tab and pass `redirectURL` to redirect users back to your site after the order is placed. The response returns a `widgetUrl`. A `widgetUrl` is valid for 5 minutes and can only be used once. A new `widgetUrl` must be generated for every user flow. **Example Request:** ```bash curl --request POST \ --url https://api-gateway-stg.transak.com/api/v2/auth/session \ --header 'access-token: YOUR_ACCESS_TOKEN' \ --header 'content-type: application/json' \ --data '{ "widgetParams": { "apiKey": "YOUR_API_KEY", "referrerDomain": "yourdomain.com", "redirectURL": "https://partner-app-url.com" } }' ``` ```html title="Staging" Buy/Sell Crypto with Transak ``` ```html title="Production" Buy/Sell Crypto with Transak ``` # iFrame The Transak iFrame integration allows you to embed Transak’s interface directly into your website, enabling users to buy or sell crypto without leaving your page. ## Single Embed iFrame Call the [Create Widget URL](/api/public/create-widget-url) API from your backend to generate a secure widget url using Query parameters The response returns a `widgetUrl`. A `widgetUrl` is valid for 5 minutes and can only be used once. A new `widgetUrl` must be generated for every user flow. **Example Request:** ```bash curl --request POST \ --url https://api-gateway-stg.transak.com/api/v2/auth/session \ --header 'access-token: YOUR_ACCESS_TOKEN' \ --header 'content-type: application/json' \ --data '{ "widgetParams": { "apiKey": "YOUR_API_KEY", "referrerDomain": "yourdomain.com" } }' ``` Add the `widgetUrl` to your page by embedding the iframe and message listener below. **Example:** ```html
``` ### Extensions We do not recommend using the extension integration, as the Transak interface requires browser camera permission. Integration will only work if the browser permission is already set to **Allow**. Chrome extensions built using [Manifest v3](https://developer.chrome.com/docs/extensions/mv3/declare_permissions/) cannot programmatically request access to the device camera. Since the Transak KYC flow requires camera access for identity verification (such as capturing ID documents or performing liveness checks), the extension cannot trigger the browser’s camera permission prompt when the widget loads. Because of this limitation, the KYC process may fail unless the user has already manually granted camera access in their browser settings. ## Double Embed iFrame Call the [Create Widget URL](/api/public/create-widget-url) API from your backend to generate a secure widget url using Query parameters The response returns a `widgetUrl`. A `widgetUrl` is valid for 5 minutes and can only be used once. A new `widgetUrl` must be generated for every user flow. **Example Request:** ```bash curl --request POST \ --url https://api-gateway-stg.transak.com/api/v2/auth/session \ --header 'access-token: YOUR_ACCESS_TOKEN' \ --header 'content-type: application/json' \ --data '{ "widgetParams": { "apiKey": "YOUR_API_KEY", "referrerDomain": "yourdomain.com" } }' ``` Add `allow=camera;microphone;payment` to both the outer and inner iframe. If you cannot set these attributes, the widget will detect it and provide a unique KYC link during the flow (also emailed to the user). **Example:** ```typescript title="Outer iframe" import { ChangeEvent, useState } from "react"; import "./App.css"; import { useSearchParams } from "react-router-dom"; type Environment = "STAGING" | "PRODUCTION"; export default function OuterIframe() { const [searchParams] = useSearchParams(); const [environment, setEnvironment] = useState( (searchParams.get("environment") as Environment) || "STAGING" ); const [sessionId, setSessionId] = useState( (searchParams.get("sessionId") || "") ); const [apiKey, setApiKey] = useState( searchParams.get("apiKey") || "" ); const toggleEnvironment = (selectedEnvironment: Environment) => { setEnvironment(selectedEnvironment); }; const handleApiChange = (e: ChangeEvent) => { setApiKey(e.target.value); }; const apiUrl = environment === "STAGING" ? `https://transak-double-iframe-supporter.vercel.app/staging?environment=${environment}` : `https://transak-double-iframe-supporter.vercel.app/production?environment=${environment}`; const finalUrl = `${apiUrl}${apiKey ? `&apiKey=${apiKey}` : ""}`; return (
API Key
); }; export const Production = () => { const [searchParams] = useSearchParams(); const apiKey = searchParams.get("apiKey") || " "; return ( ); }; export const Home = () => { return
Transak Double iframe Supporter
; }; const router = createBrowserRouter([ { path: "/", element: , }, { path: "/staging", element: , }, { path: "/production", element: , }, ]); export default function App() { return ; } ``` ## Events
Event Name Description
TRANSAK_WIDGET_INITIALISED Widget initialised with query params
TRANSAK_WIDGET_OPEN Widget fully loaded
TRANSAK_ORDER_CREATED Order created by user
TRANSAK_ORDER_SUCCESSFUL Order is successful
TRANSAK_ORDER_CANCELLED Order is cancelled
TRANSAK_ORDER_FAILED Order is failed
TRANSAK_WIDGET_CLOSE Widget is about to close
# JavaScript SDK The Transak JavaScript SDK integration allows you to integrate Transak into your application, making it easy to launch and manage the Transak interface within your web project. The NPM page for the SDK can be found here: [@transak/ui-js-sdk](https://www.npmjs.com/package/@transak/ui-js-sdk) ```bash npm install @transak/ui-js-sdk ``` ```bash yarn add @transak/ui-js-sdk ``` Initialize the SDK with `widgetUrl` and add event listeners in your app. **Example:** ```typescript title="SDK v2 - TypeScript" import { TransakConfig, Transak } from '@transak/ui-js-sdk'; const transakConfig: TransakConfig = { widgetUrl: "https://global-stg.transak.com?apiKey=YOUR_API_KEY&sessionId=", // ..... }; const transak = new Transak(transakConfig); transak.init(); // To get all the events Transak.on('*', (data) => { console.log(data); }); // This will trigger when the user closed the widget Transak.on(Transak.EVENTS.TRANSAK_WIDGET_CLOSE, () => { console.log('Transak SDK closed!'); }); /* * This will trigger when the user has confirmed the order * This doesn't guarantee that payment has completed in all scenarios * If you want to close/navigate away, use the TRANSAK_ORDER_SUCCESSFUL event */ Transak.on(Transak.EVENTS.TRANSAK_ORDER_CREATED, (orderData) => { console.log(orderData); }); /* * This will trigger when the user marks payment is made * You can close/navigate away at this event */ Transak.on(Transak.EVENTS.TRANSAK_ORDER_SUCCESSFUL, (orderData) => { console.log(orderData); transak.close(); }); ``` ```javascript title="SDK v1 - JavaScript" import transakSDK from '@transak/transak-sdk'; let transak = new transakSDK({ widgetUrl: "https://global-stg.transak.com?apiKey=YOUR_API_KEY&sessionId=", // ..... }); transak.init(); // To get all the events transak.on(transak.ALL_EVENTS, (data) => { console.log(data); }); // This will trigger when the user closed the widget transak.on(transak.EVENTS.TRANSAK_WIDGET_CLOSE, (orderData) => { transak.close(); }); // This will trigger when the user marks payment is made transak.on(transak.EVENTS.TRANSAK_ORDER_SUCCESSFUL, (orderData) => { console.log(orderData); transak.close(); }); ``` **React: Cleanup** - If you are using React 18+, do not forget to run the cleanup code. ```typescript useEffect(() => { transak.init(); // Cleanup code return () => { transak.close(); }; }, []); ``` Call the [Create Widget URL](/api/public/create-widget-url) API from your backend to generate a secure widget url using Query parameters The response returns a `widgetUrl` that should be passed as widgetUrl in Step 2. A `widgetUrl` is valid for 5 minutes and can only be used once. A new `widgetUrl` must be generated for every user flow. **Example Request:** ```bash curl --request POST \ --url https://api-gateway-stg.transak.com/api/v2/auth/session \ --header 'access-token: YOUR_ACCESS_TOKEN' \ --header 'content-type: application/json' \ --data '{ "widgetParams": { "apiKey": "YOUR_API_KEY", "referrerDomain": "yourdomain.com" } }' ``` ## Events The Transak SDK emits the following events, which you can use to track state and user actions.
Event Name Description
TRANSAK_WIDGET_INITIALISED Widget initialised with query params
TRANSAK_WIDGET_OPEN Widget fully loaded
TRANSAK_ORDER_CREATED Order created by user
TRANSAK_ORDER_SUCCESSFUL Order is successful
TRANSAK_ORDER_CANCELLED Order is cancelled
TRANSAK_ORDER_FAILED Order is failed
TRANSAK_WIDGET_CLOSE Widget is about to close
# Android The Transak Android integration allows you to embed a fully functional interface directly into your native Android application using Webview. Google Pay is not supported with Android webview integration. Update your `AndroidManifest.xml` to include required permissions for internet access and camera (for KYC verification): ```xml ``` Configure your MainActivity to load the Transak widget URL using your preferred implementation: ```kotlin title="Compose" import android.webkit.PermissionRequest import android.webkit.WebChromeClient import android.webkit.WebView ... AndroidView( factory = { WebView(it).apply { this.layoutParams = ViewGroup.LayoutParams( ViewGroup.LayoutParams.MATCH_PARENT, ViewGroup.LayoutParams.MATCH_PARENT ) this.settings.javaScriptEnabled = true this.settings.domStorageEnabled = true this.webChromeClient = object : WebChromeClient() { override fun onPermissionRequest(request: PermissionRequest) { request.grant(request.resources) } } } }, update = { it.loadUrl( "https://global-stg.transak.com?apiKey=&sessionId=" ) } ) ``` ```kotlin title="Kotlin" import android.webkit.PermissionRequest import android.webkit.WebChromeClient ... transakWidgetView.run { this.settings.javaScriptEnabled = true this.settings.domStorageEnabled = true this.webChromeClient = object : WebChromeClient() { override fun onPermissionRequest(request: PermissionRequest) { request.grant(request.resources) } } loadUrl("https://global-stg.transak.com?apiKey=&sessionId=") } ``` ```java title="Java" import android.webkit.WebView; ... webView = (WebView) findViewById(R.id.transakWidgetView); webView.getSettings().setJavaScriptEnabled(true); webView.getSettings().setDomStorageEnabled(true); webView.setWebChromeClient(new WebChromeClient() { @Override public void onPermissionRequest(PermissionRequest request) { super.onPermissionRequest(request); request.grant(request.getResources()); } }); webView.loadUrl("https://global-stg.transak.com?apiKey=&sessionId="); ``` Add the WebView to your `activity_main.xml` layout file: ```xml ``` Call the [Create Widget URL](/api/public/create-widget-url) API from your backend to generate a secure widget url using Query parameters The response returns a `widgetUrl` that should be used to load Transak in Android Webview. A `widgetUrl` is valid for 5 minutes and can only be used once. A new `widgetUrl` must be generated for every user flow. **Example Request:** ```bash curl --request POST \ --url https://api-gateway-stg.transak.com/api/v2/auth/session \ --header 'access-token: YOUR_ACCESS_TOKEN' \ --header 'content-type: application/json' \ --data '{ "widgetParams": { "apiKey": "YOUR_API_KEY", "referrerDomain": "yourdomain.com" } }' ``` ## Use cases Use the table below to choose the right approach for redirects, order data, and WebView events.
Feature Approach
How to redirect users back to your app after a transaction [Deeplink](#deeplinking)
How to get order data (e.g. status, order ID, amount) [Deeplink](#deeplinking), [Events](#events)
Listen to WebView events (order created, widget close, etc.) [Events](#events)
### Deeplink Transak supports deeplinking through the use of the `redirectURL` query parameter to enable seamless navigation after the purchase/sell process is completed. Add an intent filter to your AndroidManifest.xml to handle the deeplink: ```xml ``` Listen for the deeplink and parse the returned parameters in your Activity. When Transak redirects back, it includes additional query parameters appended to deeplink URL mentioned [here](/customization/query-parameters#redirecturl-1). ```kotlin override fun onNewIntent(intent: Intent?) { super.onNewIntent(intent) intent?.data?.let { uri -> val status = uri.getQueryParameter("status") val orderId = uri.getQueryParameter("order_id") val cryptoAmount = uri.getQueryParameter("cryptoAmount") // Handle more parameters } } ``` Call the [Create Widget URL](/api/public/create-widget-url) API from your backend to generate a secure widget url using Query parameters along with `redirectURL` parameter. The response returns a `widgetUrl` that should be used to load Transak in Android Webview. A `widgetUrl` is valid for 5 minutes and can only be used once. A new `widgetUrl` must be generated for every user flow. **Example Request:** ```bash curl --request POST \ --url https://api-gateway-stg.transak.com/api/v2/auth/session \ --header 'access-token: YOUR_ACCESS_TOKEN' \ --header 'content-type: application/json' \ --data '{ "widgetParams": { "apiKey": "YOUR_API_KEY", "referrerDomain": "yourdomain.com", "redirectURL": "myapp://transak-redirect" } }' ``` ### Events Transak allows listening of in-widget events (like order creation, completion, and widget close) through native event handlers in Android WebViews. Add a JavaScript interface to your WebView using the handler name Android to listen for all frontend events. ```kotlin import android.webkit.PermissionRequest import android.webkit.WebChromeClient ... transakWidgetView.run { this.settings.javaScriptEnabled = true this.settings.domStorageEnabled = true this.addJavascriptInterface(WebAppInterface(this@MainActivity), "Android") this.webChromeClient = object : WebChromeClient() { override fun onPermissionRequest(request: PermissionRequest) { request.grant(request.resources) } } loadUrl("https://global-stg.transak.com?apiKey=&sessionId=") } class WebAppInterface(private val context: Context) { @JavascriptInterface fun postMessage(eventData: String) { Log.d("WebViewEvent", "postMessage: $eventData") } } ``` #### Supported Events
Event Name Description
TRANSAK_WIDGET_INITIALISED Widget initialised with query params
TRANSAK_WIDGET_OPEN Widget fully loaded
TRANSAK_ORDER_CREATED Order created by user
TRANSAK_ORDER_SUCCESSFUL Order is successful
TRANSAK_ORDER_CANCELLED Order is cancelled
TRANSAK_ORDER_FAILED Order is failed
TRANSAK_WIDGET_CLOSE Widget is about to close
# iOS The Transak iOS integration allows you to embed a fully functional interface directly into your native iOS application using Webview. Google Pay is not supported with iOS webview integration. Update your `Info.plist` to include camera permission (required for KYC verification): ```xml NSCameraUsageDescription Permission required for Camera Access. ``` Configure your View Controller to load the Transak widget URL using your preferred implementation: ```swift title="SwiftUI" import SwiftUI import WebKit struct WebView: UIViewRepresentable { let url: URL func makeUIView(context: Context) -> WKWebView { let webview = WKWebView() return webview } func updateUIView(_ uiView: WKWebView, context: Context) { let request = URLRequest(url: url) uiView.load(request) } } struct ContentView: View { var body: some View { WebView(url: URL(string: "https://global-stg.transak.com?apiKey=&sessionId=")!) .edgesIgnoringSafeArea(.all) .padding(10) } } ``` ```swift title="UIKit" import UIKit import WebKit class WebViewController: UIViewController, WKUIDelegate, WKNavigationDelegate { @IBOutlet weak var webView: WKWebView! override func loadView() { let webConfiguration = WKWebViewConfiguration() webView = WKWebView(frame: .zero, configuration: webConfiguration) webView.uiDelegate = self webView.navigationDelegate = self view = webView } override func viewDidLoad() { super.viewDidLoad() let myURL = URL(string: "https://global-stg.transak.com?apiKey=&sessionId=") let myRequest = URLRequest(url: myURL!) webView.load(myRequest) } func webView(_ webView: WKWebView, didReceive challenge: URLAuthenticationChallenge, completionHandler: @escaping (URLSession.AuthChallengeDisposition, URLCredential?) -> Void) { if let serverTrust = challenge.protectionSpace.serverTrust { completionHandler(.useCredential, URLCredential(trust: serverTrust)) } } } ``` Call the [Create Widget URL](/api/public/create-widget-url) API from your backend to generate a secure widget url using Query parameters The response returns a `widgetUrl` that should be used to load Transak in iOS Webview. A `widgetUrl` is valid for 5 minutes and can only be used once. A new `widgetUrl` must be generated for every user flow. **Example Request:** ```bash curl --request POST \ --url https://api-gateway-stg.transak.com/api/v2/auth/session \ --header 'access-token: YOUR_ACCESS_TOKEN' \ --header 'content-type: application/json' \ --data '{ "widgetParams": { "apiKey": "YOUR_API_KEY", "referrerDomain": "yourdomain.com" } }' ``` ## Use cases Use the table below to choose the right approach for redirects, order data, and WebView events.
Feature Approach
How to redirect users back to your app after a transaction [Deeplink](#deeplinking)
How to get order data (e.g. status, order ID, amount) [Deeplink](#deeplinking), [Events](#events)
Listen to WebView events (order created, widget close, etc.) [Events](#events)
### Deeplink Transak supports deeplinking through the use of the `redirectURL` query parameter to enable seamless navigation after the purchase/sell process is completed. Add the URL scheme to your `Info.plist` to handle the deeplink ```xml CFBundleURLTypes CFBundleURLSchemes myapp ``` Listen for the deeplink and parse the returned parameters in your App When Transak redirects back, it includes additional query parameters appended to deeplink URL mentioned [here](/customization/query-parameters#redirecturl-1). ```swift @main struct SampleApp: App { @State private var deepLinkPath: URL? var body: some Scene { WindowGroup { ContentView() NavigationView { if let deepLinkPath = deepLinkPath { // handle deeplink query parameters } else { ContentView() } } .onOpenURL { url in if url.scheme == "myapp" { deepLinkPath = url } } } } } ``` Call the [Create Widget URL](/api/public/create-widget-url) API from your backend to generate a secure widget url using Query parameters along with `redirectURL` parameter. The response returns a `widgetUrl` that should be used to load Transak in iOS Webview. A `widgetUrl` is valid for 5 minutes and can only be used once. A new `widgetUrl` must be generated for every user flow. **Example Request:** ```bash curl --request POST \ --url https://api-gateway-stg.transak.com/api/v2/auth/session \ --header 'access-token: YOUR_ACCESS_TOKEN' \ --header 'content-type: application/json' \ --data '{ "widgetParams": { "apiKey": "YOUR_API_KEY", "referrerDomain": "yourdomain.com", "redirectURL": "myapp://transak-redirect" } }' ``` ### Events Transak allows listening of in-widget events (like order creation, completion, and widget close) through native event handlers in iOS WebViews. Add a script message handler to your WebView using the handler name IosWebview to listen for all frontend events. ```swift struct WebView: UIViewRepresentable { let url: URL func makeCoordinator() -> WebViewCoordinator { return WebViewCoordinator(self) } func makeUIView(context: Context) -> WKWebView { let contentController = WKUserContentController() contentController.add(context.coordinator, name: "IosWebview") let config = WKWebViewConfiguration() config.userContentController = contentController let webView = WKWebView(frame: .zero, configuration: config) webView.navigationDelegate = context.coordinator webView.load(URLRequest(url: url)) return webView } func updateUIView(_ webView: WKWebView, context: Context) {} class WebViewCoordinator: NSObject, WKNavigationDelegate, WKScriptMessageHandler { var parent: WebView init(_ parent: WebView) { self.parent = parent } func userContentController(_ userContentController: WKUserContentController, didReceive message: WKScriptMessage) { if message.name == "IosWebview", let body = message.body as? String { print(body) } } } } ``` #### Supported Events
Event Name Description
TRANSAK_WIDGET_INITIALISED Widget initialised with query params
TRANSAK_WIDGET_OPEN Widget fully loaded
TRANSAK_ORDER_CREATED Order created by user
TRANSAK_ORDER_SUCCESSFUL Order is successful
TRANSAK_ORDER_CANCELLED Order is cancelled
TRANSAK_ORDER_FAILED Order is failed
TRANSAK_WIDGET_CLOSE Widget is about to close
# React Native The Transak React Native integration allows you to embed a fully functional interface directly into your React Native application. Google Pay works only with the Transak React Native SDK integration for mobile applications. ## Integration Methods Fastest way to integrate Transak in Expo and non-Expo apps with built-in callbacks and event support. Direct WebView-based integration using `react-native-webview`. ### Transak React Native SDK (Recommended) Official Transak SDK with built-in event handling, callbacks, and simplified camera permissions for both Expo and Non-Expo implementations. Install the Transak SDK based on your project setup. Install the React Native SDK: ```bash npm i @transak/ui-react-native-sdk ``` Install required peer dependencies: ```bash npm i react-native-webview npm i react-native-inappbrowser-reborn npm i @react-native-community/netinfo ``` Install the Expo SDK: ```bash npm i @transak/ui-expo-sdk ``` Install required peer dependencies: ```bash npm i react-native-webview npm i expo-web-browser npm i @react-native-community/netinfo ``` Add required camera and media permissions for KYC verification in Android and iOS. ```xml title="Android (AndroidManifest.xml)" ``` ```xml title="iOS (Info.plist)" NSCameraUsageDescription Camera Access NSLocationWhenInUseUsageDescription Location Access NSMicrophoneUsageDescription Mic Access NSPhotoLibraryUsageDescription Photo Library Access ``` Add the TransakWebView component to your app with event handling. ```typescript title="React Native (without Expo)" import { TransakWebView, Events, TransakConfig, OnTransakEvent, } from '@transak/ui-react-native-sdk'; function TransakWebViewIntegration() { const transakConfig: TransakConfig = { widgetUrl: "https://global-stg.transak.com?apiKey=YOUR_API_KEY&sessionId=" }; const onTransakEventHandler: OnTransakEvent = (event, data) => { switch (event) { case Events.TRANSAK_WIDGET_INITIALISED: console.log('Widget initialized:', event, data); break; case Events.TRANSAK_ORDER_CREATED: console.log('Order created:', event, data); break; case Events.TRANSAK_ORDER_SUCCESSFUL: console.log('Order successful:', event, data); break; case Events.TRANSAK_ORDER_FAILED: console.log('Order failed:', event, data); break; case Events.TRANSAK_WIDGET_CLOSE: console.log('Widget closed:', event, data); break; default: console.log('Widget event:', event, data); } }; return ( ); } ``` ```typescript title="React Native (with Expo)" import { TransakWebView, Events, TransakConfig, OnTransakEvent, } from '@transak/ui-expo-sdk'; function TransakWebViewIntegration() { const transakConfig: TransakConfig = { widgetUrl: "https://global-stg.transak.com?apiKey=YOUR_API_KEY&sessionId=" }; const onTransakEventHandler: OnTransakEvent = (event, data) => { switch (event) { case Events.TRANSAK_WIDGET_INITIALISED: console.log('Widget initialized:', event, data); break; case Events.TRANSAK_ORDER_CREATED: console.log('Order created:', event, data); break; case Events.TRANSAK_ORDER_SUCCESSFUL: console.log('Order successful:', event, data); break; case Events.TRANSAK_ORDER_FAILED: console.log('Order failed:', event, data); break; case Events.TRANSAK_WIDGET_CLOSE: console.log('Widget closed:', event, data); break; default: console.log('Widget event:', event, data); } }; return ( ); } ``` Call the [Create Widget URL](/api/public/create-widget-url) API from your backend to generate a secure widget url using Query parameters The response returns a `widgetUrl` that should be used in the `transakConfig` prop. A `widgetUrl` is valid for 5 minutes and can only be used once. A new `widgetUrl` must be generated for every user flow. **Example Request:** ```bash curl --request POST \ --url https://api-gateway-stg.transak.com/api/v2/auth/session \ --header 'access-token: YOUR_ACCESS_TOKEN' \ --header 'content-type: application/json' \ --data '{ "widgetParams": { "apiKey": "YOUR_API_KEY", "referrerDomain": "yourdomain.com" } }' ``` **Component Props**
Prop Description
transakConfig Supports widgetUrl and referrer as mandatory parameters
onTransakEvent Callback function to listen to widget events
### React Native WebView For teams that prefer managing the WebView directly, you can use the `react-native-webview` library. Add required camera and media permissions for KYC verification in Android and iOS. ```xml title="Android (AndroidManifest.xml)" ``` ```xml title="iOS (Info.plist)" NSCameraUsageDescription Camera Access NSLocationWhenInUseUsageDescription Location Access NSMicrophoneUsageDescription Mic Access NSPhotoLibraryUsageDescription Photo Library Access ``` Install the WebView package: ```bash npm i react-native-webview ``` Import and render the WebView with the Transak widget URL: ```javascript import { WebView } from 'react-native-webview'; &sessionId=' }} enableApplePay allowsInlineMediaPlayback mediaPlaybackRequiresUserAction={false} /> ``` These props should not be passed for Apple Pay to function properly.
  • `sharedCookiesEnabled`
  • `injectedJavaScript`
  • `injectedJavaScriptBeforeContentLoaded`
Call the [Create Widget URL](/api/public/create-widget-url) API from your backend to generate a secure widget url using Query parameters The response returns a `widgetUrl` that should be used as the source URL in the WebView. A `widgetUrl` is valid for 5 minutes and can only be used once. A new `widgetUrl` must be generated for every user flow. **Example Request:** ```bash curl --request POST \ --url https://api-gateway-stg.transak.com/api/v2/auth/session \ --header 'access-token: YOUR_ACCESS_TOKEN' \ --header 'content-type: application/json' \ --data '{ "widgetParams": { "apiKey": "YOUR_API_KEY", "referrerDomain": "yourdomain.com" } }' ``` ## Supported Events
Event Name Description
TRANSAK_WIDGET_INITIALISED Widget initialised with query params
TRANSAK_ORDER_CREATED Order created by user
TRANSAK_ORDER_SUCCESSFUL Order is successful
TRANSAK_ORDER_CANCELLED Order is cancelled
TRANSAK_ORDER_FAILED Order is failed
TRANSAK_WALLET_REDIRECTION Widget is about to redirect to passed URL
TRANSAK_WIDGET_CLOSE Widget is about to close
# Flutter (Deprecated) ## Why Flutter is not supported Transak’s mobile experience is designed as a complete, end-to-end flow where product functionality, compliance requirements, payments, and KYC processes work seamlessly within a single, auditable journey. To ensure reliability, we specifically design, test, and support these flows on Android, iOS, and React Native covering critical aspects such as native permission handling (e.g., camera and media access for verification) and WebView behaviour for sessions, redirects. Flutter, however, uses a different WebView and plugin architecture. As a result, we have not yet been able to fully validate or support the same level of consistency and reliability for key flows such as KYC capture and permission handling on Flutter. For this reason, Flutter is currently not supported. # Query Parameters **Query Parameters** help partners customize the Transak experience across **On-Ramp, Off-Ramp, and NFT Checkout** flows. Pass the supported parameters in the `widgetParams` of the [Create Widget URL API](/api/public/create-widget-url) to customize the user flow. `apiKey` and `referrerDomain` are mandatory for all products. ```bash {9} curl --request POST \ --url https://api-gateway-stg.transak.com/api/v2/auth/session \ --header 'access-token: YOUR_ACCESS_TOKEN' \ --header 'content-type: application/json' \ --data '{ "widgetParams": { "apiKey": "YOUR_API_KEY", "referrerDomain": "yourdomain.com", // Add any other supported parameters here } }' ``` Controls the visual look, layout, and product mode of the widget. Switches between `STAGING` and `PRODUCTION` environments. Height of the widget iFrame. Width of the widget iFrame. Widget primary color in hex (e.g. `#000000`). Used for buttons, links, and highlights. Defaults to the user's system theme when not set. When `true`, hides the menu options completely. Services to display: `BUY` (on-ramp only), `SELL` (off-ramp only), or `BUY,SELL` (both). Order controls which tab appears first. SELL must be enabled in the partner portal. Controls everything visible on the exchange screen — title, currencies, amounts, networks, payment methods, and fee display. **General** Custom title for the exchange screen. Cannot be changed when both BUY and SELL are active simultaneously. When `true`, skips the exchange screen entirely. Requires `fiatCurrency`, `network`, `paymentMethod`, and `cryptoCurrencyCode` for BUY; additionally `cryptoAmount` for SELL. When `true`, hides the fee breakdown and shows only the total fee. Ignored if your fee exceeds 1%. **Fiat Currency** Fiat currency code (e.g. `GBP`). Customer **cannot** change. Default fiat currency; customer can change. Skipped if `fiatCurrency` or `countryCode` is passed. Use alongside `defaultFiatAmount`, not `fiatAmount`. Fixed fiat amount. Customer **cannot** change. Skipped if `fiatCurrency` or `countryCode` is not passed. Default fiat amount; customer can change. Skipped if `fiatCurrency`/`countryCode` not passed, or if `fiatAmount` is set. [ISO 3166-1 alpha-2](https://en.wikipedia.org/wiki/ISO_3166-1_alpha-2) country code (e.g. `IN`). Sets fiat currency based on country. Skipped if `fiatCurrency` is passed. Comma-separated fiat currencies to hide from the dropdown (e.g. `GBP,EUR`). Skipped if `fiatCurrency` or `countryCode` is passed. **Crypto Currency** Crypto currency code (e.g. `DAI`). Customer **cannot** change. See [supported cryptocurrencies](https://transak.com/crypto-coverage). Default cryptocurrency; customer can change. Skipped if `cryptoCurrencyCode` is passed. Comma-separated allowed cryptos (e.g. `ETH,DAI,USDT`). Skipped if `cryptoCurrencyCode` is passed. Default crypto amount. Skipped if `cryptoCurrencyCode` is not set, or if `fiatCurrency` + `fiatAmount`/`defaultFiatAmount` are passed. Must be within min/max limits. Fixed crypto amount to sell (e.g. `0.5678`). Customer **cannot** change. **Networks** Single allowed network (e.g. `ethereum`). Skipped if `networks` is passed. Comma-separated list of allowed networks (e.g. `ethereum,polygon`). Default network (e.g. `polygon`). Customer can still select another. **Payment Methods** Payment method to lock in. Customer **cannot** select another. See [payment method list in ](/api/public/get-fiat-currencies). Default payment method; customer can change. Skipped if `paymentMethod` is passed. See [payment method list](/api/public/get-fiat-currencies). Comma-separated payment methods to hide (e.g. `gbp_bank_transfer,sepa_bank_transfer`). Controls the destination wallet address for purchased crypto. Destination wallet address (e.g. `0x8634...`). Customer can edit. Pass `cryptoCurrencyCode` or `network` alongside. Multiple wallet addresses keyed by network/coin in JSON format. Skipped if `walletAddress` is passed. See [example](/guides/how-to-use-advanced-query-params#wallet-configuration). When `true`, customer cannot edit the destination address. Requires `walletAddress` or `walletAddressesData`. Enables wallet redirection for off-ramp flows. See [details](/guides/how-to-use-advanced-query-params#wallet-configuration). Pre-fills customer identity data to streamline or skip the KYC form. Customer email (e.g. `user@mail.com`). URL-encode if it contains special characters. User details (name, address, date of birth). If all fields are provided, the customer won't be prompted to enter them. See [example](/guides/how-to-use-advanced-query-params#user-identity--kyc). When `true`, auto-fills the email field without skipping the KYC screen. Ignored if `email` or `userData` is not passed. Session control, partner tracking IDs, and post-transaction redirects. Your domain URL. Used with `apiKey` to identify and track your project. One-time signed URL from the [Create Widget URL](/api/public/create-widget-url) API. Encapsulates all other parameters securely. Your internal order ID returned in webhook callbacks (e.g. `5e2f559511a9de`). Your internal customer ID returned in webhook callbacks (e.g. `23487492`). URL to redirect to after the transaction completes. Must be a valid `https://` URL. See [details](/guides/how-to-use-advanced-query-params#redirects--tracking). Core parameters required for any NFT Checkout integration. Pass as `true` to enable NFT Checkout mode. The calldata to pass to your smart contract. [How to generate calldata](/guides/how-to-generate-calldata-for-nft-checkout). **Note:** If the function accepts a user wallet address, use Transak's smart contract address. See [example](/products/nft-checkout#transak-smart-contract-addresses). Unique identifier for your smart contract address and network combination. Generate via [dashboard.transak.com](https://dashboard.transak.com). Staging: whitelisted immediately. Production: requires smart contract audit review. The cryptocurrency your smart contract accepts. See [supported cryptocurrencies](https://transak.com/crypto-coverage). Gas limit to execute the transaction on your smart contract. See [Ethereum Gas Docs](https://ethereum.org/en/developers/docs/gas/) for EVM chains. **Cannot be 0.** NFT data array (Base64-encoded, single element). Fields: `imageURL` (optional), `nftName` (optional), `collectionAddress`, `tokenID` (array), `price` (absolute crypto value), `quantity`, `nftType` (`ERC721` or `ERC1155`). Length of `price` and `tokenID` arrays must equal `quantity`. See [example](/guides/how-to-use-advanced-query-params#nft-checkout-parameters). Destination wallet, fiat currency, and payment method controls for the NFT purchase flow. **Wallet** Blockchain address where the purchased NFT will be sent. Users can edit. Pass `cryptoCurrencyCode` or `network` to ensure a valid address. When `true`, customer cannot change the destination address. Requires `walletAddress`. **Fiat Currency** Fiat currency code for the NFT purchase (e.g. `GBP`). If unsupported, widget loads with all supported currencies. Default fiat currency; customer can change. Skipped if `fiatCurrency` or `countryCode` is passed. [ISO 3166-1 alpha-2](https://en.wikipedia.org/wiki/ISO_3166-1_alpha-2) country code (e.g. `IN`). Skipped if `fiatCurrency` is passed. **Payment Methods** Payment method to lock in (e.g. `credit_debit_card`). Customer cannot select another. See [payment method list](/customization/control-fiat-crypto-options#payment-method). Default payment method; customer can change. Skipped if `paymentMethod` is passed. Comma-separated list of payment methods to hide (e.g. `credit_debit_card`). Pre-fill customer data to streamline KYC, and set partner-level tracking identifiers. **User Identity** Email to identify the customer. URL-encode if it contains special characters. User details (name, address, date of birth). If all fields are provided, the customer won't be prompted to enter them. See [example](/guides/how-to-use-advanced-query-params#user-identity--kyc). **Tracking** Your internal order ID (e.g. `5e2f559511a9de`). Returned in webhook callbacks. Your internal customer ID (e.g. `23487492`). Returned in webhook callbacks. Visual customization options for the NFT Checkout widget. Widget primary color in hex (without `#`, e.g. `000000`). Used for buttons, links, and highlighted text. Defaults to the user's system theme when not set. Custom title for the exchange screen (e.g. `Buy NFT`). When `true`, hides menu options completely. When `true`, shows only the total fee instead of the full breakdown. Ignored if your fee exceeds 1%. Height of the widget iFrame. Width of the widget iFrame. # Customizing theme using query parameters Use Transak's theme-related query parameters in `widgetParams` to customize button colors, color mode, and the full widget theme. Pass these parameters in the [Create Widget URL API](/api/public/create-widget-url) request body when generating a `widgetUrl`. `apiKey` and `referrerDomain` are mandatory in `widgetParams` for all examples on this page. ## Primary Button Colors Use these parameters to customize the primary button background and text color. | Parameter | Description | | :----------------------- | :---------------------------------- | | `primaryButtonFillColor` | Hex color for the button background | | `primaryButtonTextColor` | Hex color for the button text | **Sample Result** Primary CTA button restyled to match brand mustard and dark grey text using `primaryButtonFillColor` and `primaryButtonTextColor`. **Sample Request** ```bash curl --request POST \ --url https://api-gateway-stg.transak.com/api/v2/auth/session \ --header 'accept: application/json' \ --header 'access-token: YOUR_ACCESS_TOKEN' \ --header 'content-type: application/json' \ --data '{ "widgetParams": { "apiKey": "YOUR_API_KEY", "referrerDomain": "yourdomain.com", "primaryButtonFillColor": "#F59E0B", "primaryButtonTextColor": "#0B0B0B" } }' ``` ## Color Mode Use `colorMode` to switch the widget between light and dark themes. | Parameter | Allowed values | Description | | :---------- | :-------------- | :------------------------- | | `colorMode` | `LIGHT`, `DARK` | Sets the widget theme mode | **Sample Result** **Sample Request** ```bash curl --request POST \ --url https://api-gateway-stg.transak.com/api/v2/auth/session \ --header 'accept: application/json' \ --header 'access-token: YOUR_ACCESS_TOKEN' \ --header 'content-type: application/json' \ --data '{ "widgetParams": { "apiKey": "YOUR_API_KEY", "referrerDomain": "yourdomain.com", "colorMode": "DARK" } }' ``` ## Complete Theme Customization Use the following parameters together to fully align the widget with your brand. ### Brand and Text Colors | Parameter | Description | | :------------------- | :---------------------------------------- | | `brandColor` | Primary brand color for accents and links | | `textPrimaryColor` | Primary text color | | `textSecondaryColor` | Secondary or muted text color | | `labelTextColor` | Form label text color | ### Surface and Background Colors | Parameter | Description | | :-------------------------- | :-------------------------------- | | `surfaceFillColor` | Card or surface background | | `widgetBackgroundFillColor` | Widget container background | | `borderColor` | Border color for inputs and cards | ### Status Colors | Parameter | Description | Example value | | :----------- | :------------------------ | :------------ | | `greenColor` | Success or positive state | `#10B981` | | `redColor` | Error or negative state | `#EF4444` | ### Putting It All Together Below is an example combining color mode, primary button styling, and full theme customization into a single widget URL flow. **Sample Result** **Sample Request** ```bash curl --request POST \ --url https://api-gateway-stg.transak.com/api/v2/auth/session \ --header 'accept: application/json' \ --header 'access-token: YOUR_ACCESS_TOKEN' \ --header 'content-type: application/json' \ --data '{ "widgetParams": { "apiKey": "YOUR_API_KEY", "referrerDomain": "yourdomain.com", "brandColor": "#F6DC2D", "textPrimaryColor": "#FFFFFF", "textSecondaryColor": "#8F8F8F", "labelTextColor": "#FFFFFF", "surfaceFillColor": "#452167", "widgetBackgroundFillColor": "#300856", "borderColor": "#6A4D85", "greenColor": "#34D399", "redColor": "#EF4444" } }' ``` # How To Create a Partner Dashboard Account A Transak **Partner Dashboard** account is the starting point for every integration. Once created, you get your **staging API key** immediately and unlock your **production API key** after KYB approval. A corporate email address to sign up at the Partner Dashboard. Go to [dashboard.transak.com](https://dashboard.transak.com/) and sign up using your **corporate email address**. After signing up, log in at [dashboard.transak.com](https://dashboard.transak.com/) with your credentials. Submit your business verification at [forms.transak.com/kyb](https://forms.transak.com/kyb) using the **same email address** as your partner account. KYB approval is required to use your **production API key**. Your staging API key is available immediately. Use the **Environment** dropdown at the top of the page to switch between **Staging** and **Production**. Click **Developers** in the left-hand navigation panel. Copy the **API Key** and **API Secret** displayed for the selected environment. Switch environments and repeat if you need both sets of credentials. Never expose your API secret in client-side code or public repositories. Use it only from a secure backend. # How to Add Partner Fees and Set Up Partner Payouts This guide explains how partners can: * Add a custom **partner fee** in the Partner Dashboard * Understand how that fee works on top of **Transak's baseline fee** * Configure **manual payout withdrawals** for partner fee settlements ## Configure partner fees in the dashboard Partners can add a custom partner fee of up to **5%** on top of **Transak's baseline fee** from the **Products & Services** tab in the Partner Dashboard. Go to [dashboard.transak.com](https://dashboard.transak.com/) and sign in with your partner account. Use the **Environment** selector in the top-right corner to switch between **Staging** and **Production**, depending on where you want to configure the fee. In the left-hand navigation, open **Products**. Find the partner fee setting and enter the custom fee percentage you want to charge. You can configure a partner fee of up to **5%**. This fee is added on top of Transak's baseline fee. Review the percentage carefully and save or update the setting in the dashboard. ## How partner fees work * The **partner fee** is the additional fee you charge your users. * It is applied on top of **Transak's baseline fee**. * The configured fee is environment-specific, so verify whether you are updating **Staging** or **Production** before saving. For a broader explanation of pricing and fee calculation, see [Partner FAQs](/guides/partner-faqs#how-does-transak-calculate-prices-and-fees). ## Configure partner payout withdrawals Partner fee payouts are configured manually. To set up withdrawals, email [ap.uk@transak.com](mailto:ap.uk@transak.com) with: * Your preferred stablecoin: `USDC` or `USDT` * The network you want to receive payouts on, for example `Polygon` or `ERC-20` * Your destination wallet address Make sure the wallet address matches the stablecoin and network you request. Sending the wrong network or address can delay payout setup. ## Payout schedule Once payout details are configured, automated partner payouts are processed between the **4th and 7th of every month**. If you need to change your payout currency, network, or wallet address, contact [ap.uk@transak.com](mailto:ap.uk@transak.com) again with the updated details before the next payout cycle. Payouts below **\$20** are rolled over to the following month and will only be disbursed once the accumulated balance exceeds **\$20**. # How to Test Using Sandbox Credentials ## KYCThe KYC (Know Your Customer) experience on the staging environment closely mirrors the experience on the production environment. The primary difference between the two environments is that all checks performed on the staging environment are dummy checks, and the KYC result on staging is always approved.### Creating Test Account in Staging: (Europe Account)You can use the below credentials to create a staging account for **France** KYC Level 1 and Level 2 verified users.- **Level 1**: Lite KYC — Only Personal and Address details are required. - **Level 2**: Standard KYC — Personal, Address, and ID Proof (Document and Selfie) are required.| Field | Value | | ------------- | ------------------ | | First Name | **Doe** | | Last Name | **Jane** | | Mobile Number | **+33 791112345** | | Date of birth | **01-01-1998** || Field | Value | | --------------- | ------------------------------------------- | | Address Line | **170 Rue du Faubourg Saint-Denis, Paris** | | State/Region | **Paris** | | City | **Paris** | | Postal/Zip Code | **75010** |- Choose your **Issuing Country** as **France** - Choose your **Accepted documents** as **Driver's license** - Use the test document below (the same document can be used to upload the front and back sides)Download Test Document- The Upload document option is available only in the desktop version.To create a test account on mobile in staging, use your mobile camera to take a picture of the test document.- This is the final step in the KYC verification process. - Please be aware that only genuine selfies are accepted for account creation.Your KYC will be instantly approved in the staging environment upon submission of the valid documents.
  • For US: Use SSN no. 123456789 to create a test account.
  • For India: Use PAN no. ABCDE1234A to place INR order.
## Payment Credentials- Test UTR no: `345678909872` (INR) (Alter the mentioned number each time you attempt it) - Test IBAN: Use **IBAN generator** to generate your unique IBAN - If you're required to enter a code to validate the bank account or phone number for the test transactions, you can enter `000000` for both to complete this verification.You can use the below test cards to test card payments.| Card Type | Card Number | Expiration | CVV | Fiat Currencies | | :-------- | :--------------- | :--------- | :-- | :--------------------------------------------------------- | | VISA | 4024764449971519 | 10/33 | 123 | USD, IDR | | VISA | 4242424242424242 | 10/33 | 100 | GBP, EUR, AUD, CAD, CHF, NOK, JPY, KRW, ZAR, NZD, SGD, HKD |The password for Payment Authorization 3Ds screen is **Checkout1!** in stagingYou can use the below test cards to test withdrawals by card payments.| Card Type | Card Number | Expiration | CVV | Fiat Currencies | | :-------- | :--------------- | :--------- | :-- | :-------------- | | VISA | 4024764449971519 | 10/33 | 000 | USD | | VISA | 4076613139850359 | 10/33 | 000 | SGD | | VISA | 4800337630495182 | 10/33 | 000 | EUR | | VISA | 4921817844445119 | 10/33 | 000 | GBP |Use `000000` for both the bank account and phone number verification codes during test transactions.For testing Google pay transaction, user need to join one group from this [link](https://developers.google.com/pay/api/web/guides/resources/test-card-suite) from valid gmail account to enable test cards.| Field | Value | | :------------------------ | :-------------- | | Test Mobile Number | +56 61 789 6283 | | Test Valid OTP (All Zero) | 000000 |**Successful Payment**| Username | Password | OTP | | :------- | :------------- | :----- | | 91284 | strongpassword | 222000 |**Negative Scenarios: User didn't authorize bank account**.| Username | Password | | :------- | :---------- | | 28284 | badpassword |Upon failed authorization, user will be redirected back to `failure_redirect_url`.A payment method which is not available on this page is not available for testing in the staging environment.## Simulating Failed & Refunded OrdersTo simulate failed and refunded orders in the staging environment, simply use special email aliases. This allows you to test how your system responds to unsuccessful transactions across all Transak products.### How to Simulate- Add `+refund` to your email address to simulate a refunded order. - Add `+failed` to simulate a failed order.| Base Email | Refund Email | Failed Email | | :------------ | :------------------- | :------------------- | | `xyz@abc.com` | `xyz+refund@abc.com` | `xyz+failed@abc.com` |Most email providers support plus addressing, so emails sent to aliased addresses like `yourname+refund@example.com` will still be delivered to your main inbox.Use any available payment method.- Orders made with a `+refund` email will automatically be marked as **REFUNDED** - Orders made with a `+failed` email will automatically be marked as **FAILED**## Blockchain Testnets (Onramp)`ERC-20` token transfers across the following five networks will utilize the `ERC-20` `Transak Test Token (TRNSK)`.- **ERC-20 example (staging):** Buying **100 USDC** on **Polygon** delivers **100 TRNSK** to your wallet; the transaction hash shows a transfer of **100 Transak Test Token**. - **Native tokens:** Buying **1 ETH** on **Ethereum** or **100 MATIC** on **Polygon** still completes successfully, but **no tokens** are sent to your wallet. - **Off-ramp:** Buy **TRNSK** via on-ramp, then send **TRNSK** to us to test off-ramping.This is applicable for all Transak products (On-ramp, NFT Checkout, Transak One). We don't send native tokens like ETH, MATIC, BNB on their respective blockchains. Only ERC-20 tokens are sent on the chains mentioned below.| Blockchain | Testnet | TRNSK address | | :------------------ | :---------- | :------------------------------------------------------------------------------------------------------------------------------------- | | Ethereum | Sepolia | [0x0c86a754a29714c4fe9c6f1359fa7099ed174c0b](https://sepolia.etherscan.io/token/0x0c86a754a29714c4fe9c6f1359fa7099ed174c0b) | | Polygon | Amoy | [0x0c86A754A29714C4Fe9C6F1359fa7099eD174c0b](https://www.oklink.com/amoy/token/0x0c86a754a29714c4fe9c6f1359fa7099ed174c0b) | | Arbitrum | Sepolia | [0x0c86A754A29714C4Fe9C6F1359fa7099eD174c0b](https://sepolia-explorer.arbitrum.io/address/0x0c86A754A29714C4Fe9C6F1359fa7099eD174c0b) | | Optimism | Sepolia | [0xD733D48f2a7F57D4559F98ae07f87Dab595E3523](https://sepolia-optimistic.etherscan.io/token/0xd733d48f2a7f57d4559f98ae07f87dab595e3523) | | Binance Smart Chain | BSC Testnet | [0x0c86a754a29714c4fe9c6f1359fa7099ed174c0b](https://testnet.bscscan.com/token/0x0c86a754a29714c4fe9c6f1359fa7099ed174c0b) | | Base | Sepolia | [0xD733D48f2a7F57D4559F98ae07f87Dab595E3523](https://sepolia.basescan.org/address/0xd733d48f2a7f57d4559f98ae07f87dab595e3523) | | Linea | Sepolia | [0xD733D48f2a7F57D4559F98ae07f87Dab595E3523](https://sepolia.lineascan.build/token/0xd733d48f2a7f57d4559f98ae07f87dab595e3523) |Apart from the tokens and chains mentioned above, actual tokens will not be delivered to your wallet, but you can place a dummy order to see the user experience.## Testing Off ramp ordersFor off-ramp, place orders only for native tokens supported and transfer the official testnet token on that network for order to be reconciled automatically. # How to Track Order Status Track the status of user orders and receive real-time updates using any of the following integration options: Poll order status on demand or for reconciliation. Receive push notifications when order status changes. Subscribe to near real-time order status streams. ## Order Flow ## Order Status Reference | Status Code | Description | | --------------------------------------- | ------------------------------------------------------------------------------------------------------------ | | `AWAITING_PAYMENT_FROM_USER` | When the order is created but the payment still not received. | | `PAYMENT_DONE_MARKED_BY_USER` | When the user marks the payment as done but it is not received by us yet. | | `PROCESSING` | Orders in the PROCESSING state have passed the checks and the user's payment information has been validated. | | `PENDING_DELIVERY_FROM_TRANSAK` | When the payment is received and being exchanged & transferred via us or our liquidity partner. | | `ON_HOLD_PENDING_DELIVERY_FROM_TRANSAK` | Order is on hold. | | `COMPLETED` | When we have received the payment and the crypto is sent successfully to the user. | | `CANCELLED` | Order is cancelled. | | `FAILED` | When the order is failed, e.g.: because of the card decline. | | `REFUNDED` | Order is refunded to the user. | | `EXPIRED` | When the user failed to make the payment within the timeframe. | | Status Code | Description | | --------------------------------------- | ------------------------------------------------------------------------------------------------------------------------------------------------------------------------------------- | | `AWAITING_PAYMENT_FROM_USER` | When the order is created but the payment still not received. | | `PAYMENT_DONE_MARKED_BY_USER` | When the user marks the payment as done but it is not received by us yet. | | `PENDING_DELIVERY_FROM_TRANSAK` | When the payment is received and being exchanged & transferred via us or our liquidity partner. | | `ON_HOLD_PENDING_DELIVERY_FROM_TRANSAK` | When the crypto payment is received and being exchanged & fiat being transferred via our banking partner but because of some issue our system is unable to send the fiat to the user. | | `COMPLETED` | When we have received the crypto payment and fiat is sent successfully to the user's bank account. | | `CANCELLED` | Order is cancelled. | | `FAILED` | When the order is failed, e.g.: because of the card decline. | | `REFUNDED` | Order is refunded to the user. | | `EXPIRED` | When the user failed to make the payment within the timeframe. | ## Use Cases Check if the user has already onboarded with Transak. If so, remind them they don't need to complete KYC again. Check if the user has a pending order and direct them to complete it rather than starting a new one. If an order fails, direct the user to retry with a different payment method or card. Use Transak's user status signals (e.g. disabled user) as an input into your own risk management decisions. # Transak Different KYC Levels Transak offers a multi-level KYC structure to balance user convenience with regulatory compliance. Each level is designed for a different type of user, from someone making a quick low-value purchase to an institution moving large amounts. The [Multi-level KYC](https://transak.com/kyc) are: 1. **Level 1** — Light KYC 2. **Level 2** — Standard KYC 3. **Level 3** — Enhanced KYC ## KYC Levels | KYC Level | Purpose | Transaction Limits | Onboarding Time | | ------------------------- | ------------------------------------------------ | ------------------ | ----------------- | | **Level 1: Light KYC** | Quick onboarding for low-value transactions | \$10 to \$200 | Around 30 seconds | | **Level 2: Standard KYC** | Higher limits for everyday Web3 use cases | Up to \$25,000 | Around 10 minutes | | **Level 3: Enhanced KYC** | High-value transactions and institutional access | Up to \$75,000 | Up to 1 day | ## Key Factors for KYC Level Classification | Key Factor | Description | | --------------------------- | -------------------------------------------------------------------------------------------------- | | **KYC Country** | The country selected by the user in their address document | | **Transaction Limits** | Based on payment method, product type, fiat currency, and transaction amount | | **Time Based Limits** | Daily, monthly, and yearly caps applied on top of per-transaction limits | | **Risk Engine Evaluation** | Internal risk engine prompts Standard KYC when initial checks are not satisfied | | **Fiat and Payment Method** | Some fiat and payment method combinations are not allowed under Light KYC and trigger Standard KYC | ### KYC Country Some countries are not eligible for Light KYC due to local compliance requirements. You can check which countries support Light KYC using the [Get Countries API](https://docs.transak.com/reference/get-countries). The `isLightKycAllowed` flag in the response tells you whether Light KYC is available for that country. ## Documents Required Different KYC levels need different documents. The table below shows what is collected at each level. | Document | Light | Standard | Enhanced | | ----------------------------------------------------------------- | ----- | -------- | -------- | | **Name** | Yes | Yes | Yes | | **Phone Number** | Yes | Yes | Yes | | **Date of Birth** | Yes | Yes | Yes | | **Address** | Yes | Yes | Yes | | **Country** | Yes | Yes | Yes | | **SSN (US only)** | Yes | Yes | Yes | | **ID Verification (Photo)** | No | Yes | Yes | | **Live Selfie** | No | Yes | Yes | | **Additional Documents (Proof of income, source of funds, etc.)** | No | No | Yes | # How to Use Advanced Query Parameters Some query parameters accept structured objects or arrays instead of simple strings. This guide provides detailed examples and explains how each parameter works so you can integrate them correctly. ## Wallet Configuration Set up destination wallets and control how users interact with the crypto transfer step. Use this parameter to specify different wallet addresses for multiple networks or coins in a single request. If a currency requires a secondary identifier (tag, memo, or destination tag), include it in the `addressAdditionalData` field. ```json { "networks": { "ethereum": { "address": "0x6353D15E8A61df4eD412746654D44B8188a737C1" }, "polygon": { "address": "0x6353D15E8A61df4eD412746654D44B8188a737C1", "addressAdditionalData": "123456" } }, "coins": { "BTC": { "address": "0x6353D15E8A61df4eD412746654D44B8188a737C1" }, "DAI": { "address": "0x6353D15E8A61df4eD412746654D44B8188a737C1" }, "BNB": { "address": "0x6353D15E8A61df4eD412746654D44B8188a737C1", "addressAdditionalData": "123456" } } } ``` You can provide addresses keyed by **network name** or by **coin symbol**. The widget will automatically pick the correct address based on the user Enable wallet redirection to let your app handle the crypto transfer step directly. This is especially useful for off-ramp flows where you want to redirect users to your own withdrawal page with pre-filled transaction details. **With redirectURL** When `walletRedirection=true` is passed **with** a `redirectURL` (and `productsAvailed=SELL`): 1. The user is redirected to the `redirectURL` with order info appended as query parameters when they click **Transfer Crypto** on the *Complete Your Transfer* page. 2. A `TRANSAK_WALLET_REDIRECTION` JavaScript event is emitted with the following payload: ```json { "orderId": "Transak order ID", "fiatCurrency": "Payout fiat currency", "cryptoCurrency": "Token symbol to be transferred", "fiatAmount": "Expected payout fiat amount", "cryptoAmount": "Amount of crypto to be transferred", "isBuyOrSell": "Sell", "status": "Transak order status", "walletAddress": "Destination wallet address", "totalFeeInFiat": "Total fee charged in local currency", "partnerCustomerId": "Partner's customer ID", "partnerOrderId": "Partner's order ID", "network": "Network for the crypto transfer" } ``` 3. It is up to the partner to redirect users to their crypto withdrawal page by pre-filling the relevant details from the URL parameters or the event payload. **Without redirectURL** When `walletRedirection=true` is passed **without** a `redirectURL`: 1. Only the `TRANSAK_WALLET_REDIRECTION` frontend event is sent (with the same payload as above). 2. The partner listens for this event and redirects users to their crypto withdrawal page, pre-filling: * `cryptoCurrency` * `cryptoAmount` * `network` * `walletAddress` *** ## User Identity & KYC Pre-fill user details to speed up onboarding and reduce friction during KYC verification. Pre-fill user identity details to streamline or skip the KYC form entirely. If all required fields — name, email, mobile number, date of birth, and address — are provided, the user will not be prompted to enter them again. ```json { "firstName": "Satoshi", "lastName": "Nakamoto", "email": "satoshi.nakamoto@transak.com", "mobileNumber": "+15417543010", "dob": "1994-08-26", "address": { "addressLine1": "170 Pine St", "addressLine2": "San Francisco", "city": "San Francisco", "state": "CA", "postCode": "94111", "countryCode": "US" } } ``` **US Postal Code Format:** The correct format is either 5 digits (`12345`) or 9 digits with a hyphen (`12345-6789`). *** ## Redirects & Tracking Control where users land after completing a transaction and capture order details for your backend. After a transaction completes, the user is redirected to the URL you provide via `redirectURL`. Transak automatically appends the following query parameters so you can track the transaction on your end. | Parameter | Description | | ------------------- | -------------------------------------------- | | `orderId` | Transak order ID | | `fiatCurrency` | Payout fiat currency | | `cryptoCurrency` | Token symbol to be transferred | | `fiatAmount` | Expected payout fiat amount | | `cryptoAmount` | Amount of crypto to be transferred | | `isBuyOrSell` | `Sell` for off-ramp flows | | `status` | Transak order status | | `walletAddress` | Destination wallet address | | `totalFeeInFiat` | Total fee charged in local currency | | `partnerCustomerId` | Partner's customer ID (if present) | | `partnerOrderId` | Partner's order ID (if present) | | `network` | Network on which the crypto transfer is made | **Example redirect URL:** ``` https://www.url.com/?orderId={{id}}&fiatCurrency={{code}}&cryptoCurrency={{code}}&fiatAmount={{amount}}&cryptoAmount={{amount}}&isBuyorSell=Sell&status={{orderStatus}}&walletAddress={{address}}&totalFeeInFiat={{amount}}&partnerCustomerId={{id}}&partnerOrderId={{id}}&network={{code}} ``` The `redirectURL` parameter is supported across all integration methods — SDK, iFrame, Redirect Link, Webview, and React Native SDK. However, **deeplinking** (for example, redirecting users back into a mobile app) is only supported with the **Browser Redirection** integration method. *** ## Token & Currency Configuration Customize which tokens and currencies are available in the widget, including custom or unlisted tokens. Use this parameter to display a custom cryptocurrency in the widget that isn't natively supported by Transak. Provide the token code, display name, and an image URL so it appears correctly in the UI. ```json [ { "cryptoCurrencyCode": "AUSDC", "cryptoCurrencyName": "Aave USDC", "cryptoCurrencyImageURL": "https://assets.coingecko.com/coins/images/11674/standard/aUSDC.png?1696511564" } ] ``` Specify which token the user should pay with and how much. This is useful when you want to lock in a particular source token and amount for a swap or on-ramp transaction. ```json [ { "sourceTokenCode": "USDC", "sourceTokenAmount": 10 } ] ``` *** ## NFT Checkout Parameters Configure NFT metadata, marketplace details, and smart contract calldata for NFT purchase flows. Pass NFT metadata to configure the NFT Checkout experience. Each entry describes a collection, including the token IDs, individual prices, quantity, and the NFT standard (`ERC721` or `ERC1155`). ```javascript [ { imageURL: "https://pokemon-nfts.s3.ap-southeast-2.amazonaws.com/images/1.png", // string nftName: "Pokemon Metadata Legends", // string collectionAddress: "0x8a20e9e8e736643161ce6a2fe8dd8dd62050cd1e", // string tokenID: ["6", "7", "8"], // string[] price: [15, 15, 15], // number[] quantity: 3, // number nftType: "ERC721" // "ERC721" | "ERC1155" } ] ``` Provide token metadata for marketplace-based NFT purchases via platforms like OpenSea. This parameter lets you pass collection details, token IDs, and marketplace-specific settings for the checkout flow. ```javascript [ { nftName: "Fight Club", // string imageURL: "https://i.seadn.io/s/raw/files/c9c65ccb29917aa39b449573090b9222.png", // string collectionAddress: "0xc491a4a3601e9923366823523efe29415f6430c3", // string tokenID: ["0", "1", "2"], // string[] | number[] marketplace: "opensea", // string normalizeRoyalties: false // boolean } ] ``` The `calldata` parameter contains the encoded hex data that is sent to your smart contract during a transaction. You'll need to generate this from your contract's ABI and compress it before passing it to Transak. Not sure how to generate calldata? See [How to Generate Calldata for NFT Checkout](/guides/how-to-generate-calldata-for-nft-checkout) for a step-by-step guide. ``` 0xf6ad734200000000000000000000000008d30445495bbcb3bab60ef5b4d1ecc3fcc65ae76334586972637676557a4e6d545756716e353456785a0000000000000000000000000000000000000000000000000000000000000000000000000000000000c000000000000000000000000000000000000000000000000000000000000001400000000000000000000000000000000000000000000000000000018b04b4d265... ``` # How to Create a Widget URL with Parameters and Test Different Scenarios This guide shows how to create a widget URL using `widgetParams`, then test different user journeys in the staging environment. ## Important change Passing query parameters directly in the hosted widget URL is deprecated. Use the **Create Widget URL API** from your backend to generate a `widgetUrl` and load that session in your app. ## Before you start * Your **API key** * Your **API secret** * A backend service where you can safely generate the access token and widget session * Access to the staging environment for testing ## Step 1: Create a Partner Access Token Generate a partner access token first. ```bash curl --request POST \ --url https://api-stg.transak.com/partners/api/v2/refresh-token \ --header 'accept: application/json' \ --header 'api-secret: YOUR_API_SECRET' \ --header 'content-type: application/json' \ --data '{"apiKey":"YOUR_API_KEY"}' ``` You will receive: ```json { "data": { "accessToken": "YOUR_ACCESS_TOKEN", "expiresAt": 1770977934 } } ``` ## Step 2: Create the widget URL Call the Create Widget URL API from your backend. ```bash curl --request POST \ --url https://api-gateway-stg.transak.com/api/v2/auth/session \ --header 'accept: application/json' \ --header 'access-token: YOUR_ACCESS_TOKEN' \ --header 'content-type: application/json' \ --data '{ "widgetParams": { "apiKey": "YOUR_API_KEY", "referrerDomain": "yourdomain.com", "productsAvailed": "BUY", "fiatAmount": 100, "fiatCurrency": "EUR", "cryptoCurrencyCode": "ETH", "network": "ethereum", "paymentMethod": "credit_debit_card" } }' ``` Sample response: ```json { "data": { "widgetUrl": "https://global-stg.transak.com?apiKey=YOUR_API_KEY&sessionId=YOUR_SESSION_ID" } } ``` ## Session rules Keep these constraints in mind: * The `widgetUrl` is valid for **5 minutes** * A `sessionId` can be used only **once** * Reopening the same widget URL is not supported * Generate a fresh session for every new flow ## Common parameters to use in `widgetParams` | Parameter | Purpose | | -------------------------- | ------------------------------------------------------------- | | `apiKey` | Your Transak API key | | `referrerDomain` | Your approved website domain or app package | | `productsAvailed` | `BUY`, `SELL`, or `BUY,SELL` | | `fiatAmount` | Lock the fiat amount | | `fiatCurrency` | Lock the fiat currency | | `cryptoCurrencyCode` | Lock the crypto asset | | `network` | Lock the blockchain network | | `paymentMethod` | Lock the payment method | | `hideExchangeScreen` | Skip the exchange screen when all required values are present | | `walletAddress` | Pre-fill destination wallet | | `disableWalletAddressForm` | Prevent editing of the wallet | | `email` | Pre-fill email | | `userData` | Pre-fill lite KYC details | | `partnerOrderId` | Your internal order reference | | `partnerCustomerId` | Your internal customer reference | ## Test scenario 1: Basic buy flow Use this to validate the default path with minimal configuration. ```json { "widgetParams": { "apiKey": "YOUR_API_KEY", "referrerDomain": "yourdomain.com", "productsAvailed": "BUY", "fiatAmount": 100, "fiatCurrency": "EUR", "cryptoCurrencyCode": "ETH", "network": "ethereum" } } ``` ## Test scenario 2: Skip the exchange screen If your own app already collects the trade inputs, you can skip the exchange screen. ```json { "widgetParams": { "apiKey": "YOUR_API_KEY", "referrerDomain": "yourdomain.com", "productsAvailed": "BUY", "fiatAmount": 100, "fiatCurrency": "GBP", "cryptoCurrencyCode": "ETH", "network": "ethereum", "paymentMethod": "credit_debit_card", "hideExchangeScreen": true } } ``` ## Test scenario 3: Skip wallet confirmation ```json { "widgetParams": { "apiKey": "YOUR_API_KEY", "referrerDomain": "yourdomain.com", "walletAddress": "0xFfb61856d2aEC494e8c9cFB599b82D466124e280", "disableWalletAddressForm": true } } ``` ## Test scenario 4: Pre-fill email and lite KYC ```json { "widgetParams": { "apiKey": "YOUR_API_KEY", "referrerDomain": "yourdomain.com", "email": "doe.jane@example.com", "userData": { "firstName": "Doe", "lastName": "Jane", "mobileNumber": "+33791112345", "dob": "1998-01-01", "address": { "addressLine1": "170 Rue du Faubourg Saint-Denis", "addressLine2": "Paris", "city": "Paris", "state": "Paris", "postCode": "75010", "countryCode": "FR" } } } } ``` ## Sandbox credentials for staging Use the staging data below to test KYC flows. ### Europe test account | Field | Value | | -------------- | ---------------------------------------- | | First Name | `Doe` | | Last Name | `Jane` | | Mobile Number | `+33 791112345` | | Date of Birth | `01-01-1998` | | Address Line | `170 Rue du Faubourg Saint-Denis, Paris` | | State / Region | `Paris` | | City | `Paris` | | Postal Code | `75010` | Additional staging identifiers: * **US SSN:** `123456789` * **India PAN:** `ABCDE1234A` ## Payment test data ### Test cards | Card Type | Card Number | Expiry | CVV | Fiat currencies | | --------- | ------------------ | ------- | ----- | ---------------------------------------------------------- | | VISA | `4024764449971519` | `10/33` | `123` | USD, IDR | | VISA | `4242424242424242` | `10/33` | `100` | GBP, EUR, AUD, CAD, CHF, NOK, JPY, KRW, ZAR, NZD, SGD, HKD | ### 3DS password Use `Checkout1!` on the staging payment authorization screen. ### Bank transfer and payout testing * Test UTR: `345678909872` for INR * Use `000000` when a bank or phone verification code is requested ## Test failure scenarios with email aliases You can simulate different outcomes by changing the email address used in staging. | Scenario | Example email | | -------------- | -------------------- | | Normal flow | `xyz@abc.com` | | Refunded order | `xyz+review@abc.com` | | Failed order | `xyz+failed@abc.com` | # How to Generate Calldata for NFT Checkout ## What is calldata? `Calldata` is the encoded hex data for the smart contract function that Transak will execute during NFT Checkout. It tells the contract: * which function to call * which arguments to pass * the exact order and format of those arguments For NFT Checkout, you generate this calldata from your contract ABI and function inputs, then pass it to Transak as the `calldata` parameter. ## Prerequisite: Partner setup before you start Before you generate calldata, make sure you already have: * The ABI for the contract function that should be executed * The exact `function name` * The exact `arguments in the correct order` * The Transak NFT Checkout smart contract address for the target chain if your function accepts a recipient wallet address such as `to`, `recipient`, or `buyer` If you use a proxy contract, encode the calldata with the ABI of the **implementation contract**, `not the proxy`. If your function accepts a wallet parameter such as `to`, `recipient`, or `buyer`, pass Transak's NFT Checkout smart contract address for that chain instead of the end user's wallet address. Use [NFT Checkout smart contract addresses](/products/nft-checkout#transak-smart-contract-addresses) to get the correct chain-specific address. ## How to generate calldata ```javascript const getSupplyCalldata = (contributor: string, amount: number | null) => { if (!amount) return; /** * ABI for Supply function on AAVE SmartContract * You can find ABI of AAVE contract here: * https://mumbai.polygonscan.com/address/0xbadd48c3eb42a10db791d7b02e3c07fbf95b3155#code */ let ABI = [ { inputs: [ { internalType: "contract IPoolAddressesProvider", name: "provider", type: "address", }, ], stateMutability: "nonpayable", type: "constructor", }, { anonymous: false, inputs: [ { indexed: true, internalType: "address", name: "reserve", type: "address", }, { indexed: true, internalType: "address", name: "backer", type: "address", }, { indexed: false, internalType: "uint256", name: "amount", type: "uint256", }, { indexed: false, internalType: "uint256", name: "fee", type: "uint256", }, ], name: "BackUnbacked", type: "event", }, { anonymous: false, inputs: [ { indexed: true, internalType: "address", name: "reserve", type: "address", }, { indexed: false, internalType: "address", name: "user", type: "address", }, // ABI shortened here for practical purposes ], name: "BalanceTransfer", type: "event", }, ]; }; ``` ```typescript let parsedAmmount = parseUnits(amount.toString(), 8); // Constructing the CallData return new Interface(ABI).encodeFunctionData("supply", [ "0x2Fa2e7a6dEB7bb51B625336DBe1dA23511914a8A", // asset contract address for WBTC as an example on mumbai testnet parsedAmmount, // amount user wants to buy contributor, // address of the user who is depositing the funds 0, // referal code. Will be 0 in case of aave ]); ``` ```typescript export default function App() { useEffect(() => { const depositAmount = 0.0008; // amount user want to deposit to protocol const calldata = getSupplyCalldata( USER_WALLET_ADDRESS, // user wallet address depositAmount // amount user want to deposit. Transak will convert it to the fiat equivalent and display it to the user ); } } ``` If you are passing calldata through a widget URL or through `createWidgetUrl`, pass the raw hex string directly as the `calldata` value. ```bash title="Create Widget URL" curl --request POST \ --url https://api-gateway-stg.transak.com/api/v2/auth/session \ --header 'accept: application/json' \ --header 'access-token: YOUR_ACCESS_TOKEN' \ --header 'content-type: application/json' \ --data '{ "widgetParams": { "apiKey": "API_KEY", "walletAddress": "USER_WALLET_ADDRESS", "isNFT": true, "calldata": "0xsdad....", "nftData": [ { imageURL: "https://pokemon-nfts.s3.ap-southeast-2.amazonaws.com/images/1.png", // string nftName: "Pokemon Metadata Legends", // string collectionAddress: "0x8a20e9e8e736643161ce6a2fe8dd8dd62050cd1e", // string tokenID: ["6", "7", "8"], // string[] price: [15, 15, 15], // number[] quantity: 3, // number nftType: "ERC721" // "ERC721" | "ERC1155" } ], "contractId": "6965438baf941bf38cd", } ``` If you use the [SDK](/integration/web/js-sdk), pass the raw calldata directly in the SDK configuration. ## Full Example To Generate Calldata ```javascript const getSupplyCalldata = (contributor: string, amount: number | null) => { if (!amount) return; /** * ABI for Supply function on AAVE SmartContract * You can find ABI of AAVE contract here: * https://mumbai.polygonscan.com/address/0xbadd48c3eb42a10db791d7b02e3c07fbf95b3155#code */ let ABI = [ { inputs: [ { internalType: "contract IPoolAddressesProvider", name: "provider", type: "address", }, ], stateMutability: "nonpayable", type: "constructor", }, { anonymous: false, inputs: [ { indexed: true, internalType: "address", name: "reserve", type: "address", }, { indexed: true, internalType: "address", name: "backer", type: "address", }, { indexed: false, internalType: "uint256", name: "amount", type: "uint256", }, { indexed: false, internalType: "uint256", name: "fee", type: "uint256", }, ], name: "BackUnbacked", type: "event", }, { anonymous: false, inputs: [ { indexed: true, internalType: "address", name: "reserve", type: "address", }, { indexed: false, internalType: "address", name: "user", type: "address", }, // ABI shortened here for practical purposes ], name: "BalanceTransfer", type: "event", }, ]; let parsedAmount = parseUnits(amount.toString(), 8); return new Interface(ABI).encodeFunctionData("supply", [ "0x2Fa2e7a6dEB7bb51B625336DBe1dA23511914a8A", // asset contract address for WBTC on Mumbai testnet parsedAmount, // amount user wants to buy contributor, // address of the user who is depositing the funds 0, // referral code. Will be 0 in case of AAVE ]); }; // Create Widget URL API const calldata = getSupplyCalldata(USER_WALLET_ADDRESS, 0.0008); console.log("Use this in the SDK config:", calldata); console.log( "Or pass it in the widget URL:", `"widgetParams": { calldata: ${calldata} }` ); ``` # How to Add a NFT Smart Contract in the Dashboard and Create a contractId Use this guide to add your NFT smart contract in the Transak Dashboard and generate a `contractId` for NFT Checkout. ## What is `contractId`? `contractId` is a unique identifier for your approved smart contract. You must pass this value when creating an NFT Checkout widget session. Unique identifier for your whitelisted smart contract address and network combination. ## Prerequisites * Access to the [Transak Partner Dashboard](https://dashboard.transak.com/) * The target smart contract address * The target EVM network * The contract ABI for calldata generation NFT Checkout supports custom smart contracts on EVM-compatible chains. For **production approval**, Transak may review your contract and audit details before allowing it to be used live. ## Step 1: Open NFT Checkout in the Dashboard Go to [dashboard.transak.com](https://dashboard.transak.com/) and sign in. Choose **Staging** or **Production** from the environment selector. Go to the **Products** section and open **NFT Checkout**. ## Step 2: Add your custom smart contract Submit the required contract details in the dashboard. * Smart contract address * Network / chain * Collection or project details * Any supporting metadata requested by the dashboard flow For production, keep your contract verification and audit documentation ready if requested during review. ## Step 3: Wait for contract approval The contract must be whitelisted before it can be used in NFT Checkout. | Environment | Expected behavior | | -------------- | ----------------------------------------- | | **Staging** | Used for testing and faster validation | | **Production** | Subject to Transak review before live use | If possible, verify the contract on the relevant block explorer before requesting production approval. This generally makes review easier. ## Step 4: Copy the generated `contractId` Once the contract is approved in the dashboard, Transak generates a `contractId` for that contract and network pair. Save this value because you will need it in your widget session payload. ## Step 5: Generate calldata for your contract `contractId` is required, but it is not enough by itself. NFT Checkout also requires `calldata`. Use the dedicated guide for this part: * [How to Generate Calldata for NFT Checkout](/guides/how-to-generate-calldata-for-nft-checkout) Important rules: * Encode calldata from the ABI of the implementation contract if you use a proxy * If your function accepts `to`, `recipient`, or `buyer`, use Transak's NFT Checkout smart contract address for that chain instead of the end user's wallet address ## Step 6: Use `contractId` in Create Widget URL Pass `contractId` inside `widgetParams` together with the other NFT Checkout fields. ```bash curl --request POST \ --url https://api-gateway-stg.transak.com/api/v2/auth/session \ --header 'accept: application/json' \ --header 'access-token: YOUR_ACCESS_TOKEN' \ --header 'content-type: application/json' \ --data '{ "widgetParams": { "apiKey": "YOUR_API_KEY", "referrerDomain": "yourdomain.com", "walletAddress": "USER_WALLET_ADDRESS", "isNFT": true, "contractId": "YOUR_CONTRACT_ID", "cryptoCurrencyCode": "ETH", "estimatedGasLimit": 250000, "calldata": "0x...", "nftData": [ { "imageURL": "https://example.com/nft.png", "nftName": "My NFT", "collectionAddress": "0x8a20e9e8e736643161ce6a2fe8dd8dd62050cd1e", "tokenID": ["1"], "price": [0.05], "quantity": 1, "nftType": "ERC721" } ] } }' ``` # Get Price Based on User Region The `quoteCountryCode` parameter on the [Get Price API](/api/public/get-price) lets you request a quote tied to the user's KYC country — so the price your backend fetches always matches what the Transak Widget shows. Only [ISO Alpha-2](https://www.iban.com/country-codes) country codes are accepted for `quoteCountryCode`, for example `US`, `FR`, `IT`. ## Why use `quoteCountryCode`?
Consistent Pricing Quotes from the Get Price API match exactly what users see inside the Transak Widget — no surprises at checkout.
Region-Accurate Fees Pricing varies by region. Passing the correct country code ensures fees, limits, and rates are calculated for the right market.
## How it works Check whether you already have the user's verified KYC country (passed via `userData`) or need to fall back to their IP-detected location. Include `quoteCountryCode` in your API request query string with the appropriate Alpha-2 code (e.g. `FR` for France). The API returns pricing, fees, and limits calculated specifically for that country — ready to display to the user or use for order creation. ## Usage scenarios When the user's KYC information is already shared via the [`userData`](/customization/query-parameters) query parameter, use their KYC country directly. **Example:** User's KYC country is France -> set `quoteCountryCode=FR` If you don't have the user's KYC country, fall back to their IP-detected location as a best-effort approximation. **Example:** If the user is located in Italy, then `quoteCountryCode` can be set to `IT` based on the user's IP. ## Sample request ```bash curl --request GET \ --url 'https://api-stg.transak.com/api/v1/pricing/public/quotes?partnerApiKey=YOUR_API_KEY&fiatCurrency=USD&cryptoCurrency=ETH&isBuyOrSell=BUY&network=ethereum&paymentMethod=credit_debit_card&fiatAmount=100"eCountryCode=FR' \ --header 'accept: application/json' ``` ## Sample response ```json { "response": { "quoteId": "5b42f946-47b4-4bea-9e7e-563488d03333", "conversionPrice": 1.10475627488855, "marketConversionPrice": 1.1161162939576061, "slippage": 1.02, "fiatCurrency": "EUR", "cryptoCurrency": "USDC", "paymentMethod": "credit_debit_card", "fiatAmount": 100, "cryptoAmount": 107.68, "isBuyOrSell": "BUY", "network": "arbitrum", "feeDecimal": 0.0253, "totalFee": 2.53, "feeBreakdown": [ { "name": "Transak fee", "value": 2.51, "id": "transak_fee", "ids": ["transak_fee"] }, { "name": "Network/Exchange fee", "value": 0.02, "id": "network_fee", "ids": ["network_fee"] } ], "nonce": 1727442044, "cryptoLiquidityProvider": "transak", "notes": [] } } ``` ## Quote accuracy by scenario User Flow KYC Country Code IP Country Code `quoteCountryCode` Quote Accuracy When the KYC and IP Country are same (see Scenario 1 above) US US `US` ✅ When the KYC and IP Country are not same (see Scenario 1 above) US UK `US` ✅ When KYC Country is unknown (see Scenario 2 above)

**Note:** This might not produce the best result considering that KYC country is unknown and the user location might be different than the actual KYC Country. N/A UK `UK` 🟩 # How to Create a Partner Access Token A **Partner Access Token** is required to authenticate calls to Transak's partner APIs. You generate it by calling the Refresh Token endpoint with your API key and secret — it expires after **7 days**. Go to [dashboard.transak.com](https://dashboard.transak.com) and sign in to your partner account. Click **Developers** in the left-hand navigation panel. Your **API Key** and **API Secret** are shown on this page. Copy both — you'll need them in the next step. Never expose your API secret in client-side code or public repositories. Always make this call from a secure backend. Make a `POST` request to the Refresh Token endpoint, passing your API secret as a header and your API key in the request body. ```bash curl --request POST \ --url https://api-stg.transak.com/partners/api/v2/refresh-token \ --header 'accept: application/json' \ --header 'api-secret: YOUR_API_SECRET' \ --header 'content-type: application/json' \ --data '{"apiKey":"YOUR_API_KEY"}' ``` A successful response returns a JWT `accessToken` valid for **7 days**: ```json { "data": { "accessToken": "eyJhbI1NiIsInR5cCI6IkpXVCJ9.eyJBUElfZIjoiMDRiOGJmZDItNTQ1YS00YjU1LWFkNzQtMjY0OTQ5NmFlMTI3IiwiaWF0IjoxNzcwMzczMTM0LCJleHAiOjE3NzA5Nzc5MzR9.95zFcIfGY-YLwbah37-YyNqLL62KURoz_jUcCLfhP74", "expiresAt": 1770977934 } } ```
JWT token to include as a `Bearer` token in subsequent API requests. Unix timestamp (seconds) indicating when the token expires.
# How to Decrypt the Webhook Payload Transak sends the webhook payload in the `data` field as a signed JWT. To read the actual order or KYC payload, verify the JWT using your **Partner Access Token** and then decode its claims on your backend. ## Before You Start * Your webhook endpoint must already be configured with Transak. * You need a valid **Partner Access Token**. Follow [How to Create a Partner Access Token](/guides/how-to-create-partner-access-token). * Perform verification and decoding only on your **server**. Do not expose the access token in frontend code. Always verify the JWT signature before trusting any webhook data. Do not decode the payload without verification. ## How It Works When Transak sends a webhook, the payload includes an encrypted `data` field. Your backend should: Store the raw `data` field exactly as received from the webhook body. Use the Partner Access Token as the JWT signing secret. Verify the webhook `data` field before processing it. Reject the request if signature validation fails. Once verified, parse the claims to access the original `webhookData` object and event details. ## Code Samples **NPM Package:** [`jsonwebtoken`](https://www.npmjs.com/package/jsonwebtoken) ```bash npm install jsonwebtoken ``` ```javascript import jwt from "jsonwebtoken"; // JWT token received from the webhook response's data field const webhookData = "eyJhbGciOiJIU.eyJ3ZWJob29-rRGF0.W07q-JG6jlyzid4"; // Your Access Token — used as the signing secret const accessToken = "ACCESS_TOKEN"; // Verify and decode the JWT token const decodedData = jwt.verify(webhookData, accessToken); console.log(decodedData); ``` ```groovy dependencies { implementation 'io.jsonwebtoken:jjwt-api:0.11.5' implementation 'io.jsonwebtoken:jjwt-impl:0.11.5' implementation 'io.jsonwebtoken:jjwt-jackson:0.11.5' } ``` ```java package com.transak.webhookjavamaven; import io.jsonwebtoken.Claims; import io.jsonwebtoken.Jwts; import io.jsonwebtoken.security.Keys; import javax.crypto.SecretKey; public class WebhookJavaMavenApplication { public static void main(String[] args) { // JWT token received from the webhook response's data field String webhookData = "eyJhbGciOiJIU.eyJ3ZWJob29-rRGF0.W07q-JG6jlyzid4"; // Your Access Token — used as the signing secret String accessToken = "ACCESS_TOKEN"; SecretKey key = Keys.hmacShaKeyFor(accessToken.getBytes()); Claims claims = Jwts.parserBuilder() .setSigningKey(key) .build() .parseClaimsJws(webhookData) .getBody(); System.out.println("Claims: " + claims); } } ``` ```xml io.jsonwebtoken jjwt-api 0.11.5 io.jsonwebtoken jjwt-impl 0.11.5 io.jsonwebtoken jjwt-jackson 0.11.5 ``` ```java package com.transak.webhookjavamaven; import io.jsonwebtoken.Claims; import io.jsonwebtoken.Jwts; import io.jsonwebtoken.security.Keys; import javax.crypto.SecretKey; public class WebhookJavaMavenApplication { public static void main(String[] args) { // JWT token received from the webhook response's data field String webhookData = "eyJhbGciOiJIU.eyJ3ZWJob29-rRGF0.W07q-JG6jlyzid4"; // Your Access Token — used as the signing secret String accessToken = "ACCESS_TOKEN"; SecretKey key = Keys.hmacShaKeyFor(accessToken.getBytes()); Claims claims = Jwts.parserBuilder() .setSigningKey(key) .build() .parseClaimsJws(webhookData) .getBody(); System.out.println("Claims: " + claims); } } ``` **Package:** [`github.com/golang-jwt/jwt/v5`](https://pkg.go.dev/github.com/golang-jwt/jwt/v5) ```bash go get github.com/golang-jwt/jwt/v5 ``` ```go package main import ( "encoding/json" "fmt" "log" "github.com/golang-jwt/jwt/v5" ) func main() { // JWT token received from the webhook response's data field webhookData := "eyJhbGciOiJIU.eyJ3ZWJob29-rRGF0.W07q-JG6jlyzid4" // Your Access Token — used as the signing secret secretKey := "ACCESS_TOKEN" token, _ := jwt.Parse(webhookData, func(token *jwt.Token) (interface{}, error) { return []byte(secretKey), nil }) if claims, ok := token.Claims.(jwt.MapClaims); ok && token.Valid { jsonData, _ := json.MarshalIndent(claims, "", " ") fmt.Println("Decoded JWT Claims:\n", string(jsonData)) } else { log.Println("Invalid JWT or claims") } } ``` ## Sample Decrypted Payload ```json { "webhookData": { "id": "181b6159-2192-4f68-8647-f48e6e8f58c7", "walletAddress": "0xD902d7eBF7bcE", "createdAt": "2024-08-23T10:33:09.426Z", "status": "COMPLETED", "fiatCurrency": "EUR", "userId": "243a8ce2-9cc6-41a9-aaeb-b0deeb09a3", "cryptoCurrency": "ETH", "isBuyOrSell": "BUY", "fiatAmount": 32, "ipAddress": "35.177.158.9", "amountPaid": 32, "paymentOptionId": "sepa_bank_transfer", "walletLink": "https://sepolia.etherscan.io/address/0xD902d7eBF7bcE", "quoteId": "0b9edf4d-2de1-4f2e-bdb6-07bc61c380f5", "orderProcessingType": "NORMAL", "addressAdditionalData": false, "network": "ethereum", "conversionPrice": 0.00041416655266757863, "cryptoAmount": 0.01211023, "totalFeeInFiat": 2.76, "fiatAmountInUsd": 35.57, "countryCode": "IN", "stateCode": "Karnataka", "orderChannelType": "WIDGET", "userKycType": "STANDARD", "cardPaymentData": { "orderId": "181b6159-2192-4f68-8647-f48e6e8f58c7", "paymentId": "66c8656bb38a7908fadc77db", "pgData": { "paymentOptions": [ { "currency": "EUR", "id": "sepa_bank_transfer", "name": "Bank Transfer Details", "fields": [ { "name": "Bank Name", "value": "Transak Limited" }, { "name": "IBAN", "value": "GB69MOCK00000003743944" }, { "name": "Bank Name", "value": "Modulr" }, { "name": "Bank Address", "value": "Scale Space, 58 Wood Lane, London, W12 7RZ" } ] } ], "liquidityProvider": "MODULR", "status": "CREATED" }, "liquidityProvider": "MODULR", "updatedAt": "2024-08-23T10:33:58.753Z", "status": "CAPTURED", "processedOn": "2024-08-23T10:33:57.000Z" }, "statusHistories": [ { "status": "PENDING_DELIVERY_FROM_TRANSAK", "createdAt": "2024-08-23T10:33:59.408Z", "message": "💸 Payment reconciled successfully. Received 32 EUR", "isEmailSentToUser": false, "partnerEventId": "ORDER_PROCESSING" } ], "isFirstOrder": false, "updatedAt": "2024-08-23T10:34:06.371Z", "completedAt": "2024-08-23T10:34:39.412Z", "transactionHash": "DUMMY_TX_ID", "transactionLink": "https://sepolia.etherscan.io/tx/DUMMY_TX_ID", "conversionPriceData": { "id": "139474c7-99c5-4232-9a05-c6ccd6a973ed", "createdAt": "2024-08-23T10:34:06.352Z", "fiatCurrency": "EUR", "cryptoCurrency": "ETH", "paymentMethod": "sepa_bank_transfer", "fiatAmount": 32, "network": "ethereum", "cryptoAmount": 0.01211023, "isBuyOrSell": "BUY", "conversionPrice": 0.00041416641727771563, "marketConversionPrice": 0.00041628949369556297, "slippage": 0.51, "cryptoLiquidityProvider": "transak", "fiatLiquidityProvider": "coinbase", "partnerApiKey": "d79671a4-b021-4a4f-a444-6862a680a94b", "sourceTokenAmount": 0.012110226041200406, "sourceToken": "ETH", "notes": [], "fiatFeeAmount": 2.76, "feeDecimal": 0.08625, "swaps": [ { "sourceCurrency": "EUR", "destinationCurrency": "USDT", "sourceAmount": 32, "destinationAmount": 35.57563545494966, "paymentMethod": "sepa_bank_transfer", "liquidityProvider": "coinbase", "conversionPrice": 1.111738607967177, "feeInSourceAmount": 0, "networkFeeInSourceAmount": 0, "marketConversionPrice": 1.111738607967177, "isNonCustodial": false, "isFiatliquidityProvider": true, "isFiatPartnerDirectCryptoDeposit": false, "isFiatPartnerAccountWalletDeposit": false, "liquidityProviderData": false, "originalDestinationAmount": 35.57563545494966 }, { "sourceCurrency": "USDT", "destinationCurrency": "ETH", "sourceAmount": 35.57563545494966, "destinationAmount": 0.0132533253528869, "liquidityProvider": "transak", "conversionPrice": 0.0003725393849863884, "networkFeeInSourceAmount": 0, "networkFeeInDestinationAmount": 0, "marketConversionPrice": 0.0003725393849863884, "liquidityProviderData": false, "isNonCustodial": false }, { "sourceCurrency": "ETH", "destinationCurrency": "ETH", "sourceAmount": 0.0132533253528869, "destinationAmount": 0.0132533253528869, "liquidityProvider": "transak", "conversionPrice": 1, "isCryptoliquidityProvider": true, "networkFeeInSourceAmount": 0.000067651170404, "networkFeeInDestinationAmount": 0.000067651170404, "marketConversionPrice": 1, "liquidityProviderData": false, "isFiatPartnerAccountWalletDeposit": false } ], "fees": [ { "name": "Transak fee", "value": 2.6, "id": "transak_fee", "ids": ["transak_fee", "partner_fee"] }, { "name": "Network/Exchange fee", "value": 0.16, "id": "network_fee", "ids": ["network_fee"] } ], "fiatAmountInUsd": 35.57, "internalFees": [ { "name": "Network/Exchange fee", "id": "network_fee", "value": 0.16 }, { "name": "Transak fee", "id": "transak_fee", "value": 1 }, { "name": "Transak fee", "id": "partner_fee", "value": 1.6 } ], "cost": { "ethPriceInLocalCurrency": 2402.17448469, "gasCostinLocalCurrency": 0.16334786495892, "transakMinimumFee": 1, "transakFeeAmount": 1, "fiatLiquidityProviderFee": 0, "gasCostinLocalCurrencyByFiatPartner": 0, "gasCostinLocalCurrencyByCryptoPartner": 0, "partnerFeeDecimal": 0.05, "partnerFeeInLocalCurrency": 1.6, "totalFeeDecimal": 0.08625, "totalFeeAmount": 2.76, "gasCurrency": "ETH", "gasInNativeToken": 0.000068, "gasCurrencyRateInUsd": 0.0003744603090795391, "totalAmountChargedByTransak": 2.76334786495892 } }, "partnerFeeInLocalCurrency": 1.6 }, "eventID": "ORDER_COMPLETED", "createdAt": "2024-08-23T10:34:40.070Z" } ``` # How to add MCP Server for Transak Documentation ## What is the MCP Server? The [Model Context Protocol (MCP)](https://modelcontextprotocol.io) lets AI-powered coding tools query external knowledge sources directly from your editor. Transak exposes its full documentation as an MCP server. Once connected, your IDE can answer questions about the Transak API, integration options, query parameters, webhooks, and more without you leaving your IDE. ## MCP Server Configuration Use the following config to connect any MCP-compatible IDE to the Transak docs server: ```json title="MCP Server Config" { "mcpServers": { "docs.transak.com": { "name": "docs.transak.com", "url": "https://docs.transak.com/_mcp/server", "headers": {} } } } ``` ## How to set up the Transak Docs MCP Server in IDEs VS Code supports MCP servers via GitHub Copilot (v1.99+). Create or open the workspace MCP config file at `.vscode/mcp.json`, or add the config to your user `settings.json` under the `"mcp"` key. Add the following to `.vscode/mcp.json` (or inside `"mcp": { ... }` in your user `settings.json`): ```json { "servers": { "docs.transak.com": { "type": "http", "url": "https://docs.transak.com/_mcp/server" } } } ``` Save the file and open the GitHub Copilot chat panel. Switch to **Agent** mode and confirm `docs.transak.com` appears in the available tools. Try asking: > *"What are the Transak On Ramp widget query parameters?"* Click **Add new MCP server** (or paste directly into `~/.cursor/mcp.json`) and add the Transak docs server config: ```json { "mcpServers": { "docs.transak.com": { "name": "docs.transak.com", "url": "https://docs.transak.com/_mcp/server", "headers": {} } } } ``` Save the config and restart Cursor. The `docs.transak.com` server should appear as **connected** in the MCP settings panel. Open the AI chat and try asking: > *"How do I integrate the Transak JS SDK?"* You should receive a response sourced directly from Transak's documentation. In Windsurf, open the Cascade panel and click the **MCPs** icon, or go to **Windsurf Settings** > **Cascade** > **MCP Servers**. You can also edit the raw config at `~/.codeium/windsurf/mcp_config.json`. Add the Transak docs server under `mcpServers` using the remote HTTP server format: ```json { "mcpServers": { "docs.transak.com": { "serverUrl": "https://docs.transak.com/_mcp/server", "headers": {} } } } ``` Save the config and return to the Cascade MCP panel. The `docs.transak.com` server should appear in the list of available MCP servers. Try asking: > *"How do I integrate the Transak SDK?"* Windsurf should answer using tools exposed by the Transak documentation MCP server. Claude Code MCP servers are configured in `~/.claude/settings.json`. Open it in your editor, or run the following command to add the server via the CLI: ```bash claude mcp add --transport http docs.transak.com https://docs.transak.com/_mcp/server ``` If adding manually, ensure `~/.claude/settings.json` contains the following under `mcpServers`: ```json { "mcpServers": { "docs.transak.com": { "name": "docs.transak.com", "url": "https://docs.transak.com/_mcp/server", "headers": {} } } } ``` Run `claude mcp list` to confirm the server is registered. Then start a Claude Code session and ask: > *"What query parameters does the Transak On Ramp widget support?"* Claude Code will query the Transak docs MCP server and return relevant documentation. Codex reads the MCP server configs from `~/.codex/config.json`. Open it in your editor or create it if it does not exist yet. Add the Transak docs server under the `mcpServers` key: ```json { "mcpServers": { "docs.transak.com": { "name": "docs.transak.com", "url": "https://docs.transak.com/_mcp/server", "headers": {} } } } ``` Save the config and restart Codex. The Transak docs server should appear in the list of connected MCP servers. Ask a question to verify: > *"How do webhooks work in Transak?"* Codex will surface the answer directly from Transak's documentation. In Replit, open the **Integrations** page and scroll to the **MCP Servers** section for Replit Agent. Click **Add MCP server** and use the following values: * **Display name:** `docs.transak.com` * **Server URL:** `https://docs.transak.com/_mcp/server` * **Headers:** Leave empty If you want to share a one-click install link for Replit, use this payload format: ```json { "displayName": "docs.transak.com", "baseUrl": "https://docs.transak.com/_mcp/server", "headers": [] } ``` Click **Test & Save**. Replit will validate the connection and add the server to your MCP servers list. Once the server shows as connected, open Replit Agent and ask: > *"What webhook events does Transak support?"* Replit Agent should use the Transak docs MCP server automatically when the prompt requires Transak documentation. # Widget with API Customization Transak provides a flexible solution for partners to create a more tailored Transak experience by combining query parameters and APIs to control parts of the user journey within their own application. Partners can skip screens, prefill key user details, and use the Transak UI only where it is required in the user journey. ## Problem Statement Widgets are quick to integrate, but they can still create friction when partners want more control over the user journey, branding, and prefilled data. Here are some of the **key challenges** with a standard hosted widget flow:
Extra steps for users Users may need to repeat selections or details that your app already knows, which adds avoidable friction to the flow.
Limited journey control Partners cannot fully shape the user experience.
Repeated data entry Asking users to re-enter wallet, email, or KYC details can slow conversion and create an inconsistent experience.
Higher drop-off risk Every additional step can increase abandonment, especially when the partner app could have handled part of the journey upfront.
## Our Solution Widget with API Customization helps partners streamline the user journey by combining public APIs and query parameters. Use Transak's Public APIs to fetch [quotes](/api/public/get-price), [supported fiat currencies](/api/public/get-fiat-currencies), and [supported cryptocurrencies](/api/public/get-crypto-currencies) so your app can collect user choices before launching the widget. Pass parameters such as `fiatCurrency`, `cryptoCurrencyCode`, `walletAddress`, `email`, `userData`, and other supported fields to reduce the number of screens inside the widget. Call the [Create Widget URL](/api/public/create-widget-url) API from your backend to generate a secure widget url using Query parameters **Example Request:** ```bash curl --request POST \ --url https://api-gateway-stg.transak.com/api/v2/auth/session \ --header 'access-token: YOUR_ACCESS_TOKEN' \ --header 'content-type: application/json' \ --data '{ "widgetParams": { "apiKey": "YOUR_API_KEY", "referrerDomain": "yourdomain.com", "fiatCurrency": "ETH", ..... } }' ``` Use [Get Order By ID](/api/public/get-order-by-order-id), [Get Orders](/api/public/get-orders), [Webhooks](/features/webhooks), and [WebSockets](/features/websockets) to track the order. ## How does it work? Screen Can be skipped? Exchange Screen Yes Wallet Confirmation Screen Yes Email Verification Screen Yes OTP Verification Screen No Lite KYC Screen Yes Standard KYC Screen No Confirm Order Screen No Payment Screen No Payment Authorization Screen No Order Status Screen Yes Order History Screen Yes ## User Flow The Exchange Screen allows users to select the fiat amount, crypto asset, network, and payment method. To skip this step, collect those inputs in your own UI and pass them through `widgetParams`.
Recommended parameters

`apiKey`, `productsAvailed`, `fiatAmount`, `fiatCurrency`, `cryptoCurrencyCode`, `network`, `paymentMethod`, `hideExchangeScreen`
Useful APIs

[Get Price](/api/public/get-price), [Get Fiat Currencies](/api/public/get-fiat-currencies), [Get Crypto Currencies](/api/public/get-crypto-currencies)
This step confirms the destination wallet for on-ramp transactions. To skip this step, pass the wallet details through `widgetParams`.
Required parameters

`walletAddress`, `disableWalletAddressForm=true`
This screen is used to collect the user's email for OTP verification. To skip this step, pass the user's email through `widgetParams`.
Required parameter

`email`
OTP verification is a mandatory step and cannot be skipped. Prefilling the users email helps streamline the flow, but it does not bypass OTP verification. The Lite KYC Screen captures the user's personal and address details. To skip this step, pass structured `userData` through `widgetParams`.
Required parameter

`userData`
**Example** ```json { "firstName": "Satoshi", "lastName": "Nakamoto", "email": "satoshi.nakamoto@transak.com", "mobileNumber": "+15417543010", "dob": "1994-08-26", "address": { "addressLine1": "170 Pine St", "addressLine2": "San Francisco", "city": "San Francisco", "state": "CA", "postCode": "94111", "countryCode": "US" } } ``` Standard KYC includes document upload and liveness checks. This step is not skippable in the widget and triggered only when the order value exceeds Lite KYC limits. The Confirm Order step displays the final transaction summary before payment. This step is not skippable in the widget and shown to users before they proceed with the payment. This is where users enter or confirm payment details. This step is not skippable in the widget. To skip this step, continue the user journey in your own application by listening for the `TRANSAK_ORDER_SUCCESSFUL` event after payment is initiated.
How it works

Once the event is received, you can close the widget or move users to the next step in your own flow instead of keeping them on the completion screen.
Supported integrations

[JavaScript SDK](/integration/web/js-sdk), [Android](/integration/mobile/native-android), [iOS](/integration/mobile/native-ios), [React Native](/integration/mobile/react-native)
To skip this step, display order status updates in your own application instead of relying on the order status screen.
Supported options

[Get Order By ID](/api/public/get-order-by-order-id), [Webhooks](/features/webhooks), [WebSockets](/features/websockets)
To skip this step, display transaction history in your own application instead of relying on the order history screen.
Supported option

[Get Orders](/api/public/get-orders)
# Mandatory Migration to API-Based Widget URL All partners are required to migrate their integration to use the [Create Widget URL API](/api/public/create-widget-url), which generates a secure `widgetUrl` to load the Transak widget. This approach ensures **secure**, **validated**, and **consistent** integrations across all [integration options](/integration/api/overview). Passing query parameters directly in the widget URL is **deprecated and no longer supported**. ## How It Works Call the [Refresh Access Token](/api/public/refresh-access-token) endpoint from your backend to obtain a `Partner Access Token`. Store this token securely and reuse it until it expires. When you call the endpoint again, the previously issued token is automatically invalidated. Call the [Create Widget URL](/api/public/create-widget-url) API from your backend to generate a secure widget url using Query parameters #### Request Headers
Your Partner Access Token from Step 1. User Authorization Token — only required for integrations using the User Authentication API.
#### Request Body
Object containing all widget configuration. Your API key from the [Transak Partner Dashboard](https://dashboard.transak.com/). Your domain URL (web) or application package name (mobile).
```bash title="Staging" curl --request POST \ --url https://api-gateway-stg.transak.com/api/v2/auth/session \ --header 'accept: application/json' \ --header 'access-token: YOUR_ACCESS_TOKEN' \ --header 'authorization: YOUR_USER_AUTH_TOKEN' \ --header 'content-type: application/json' \ --data '{ "widgetParams": { "apiKey": "YOUR_API_KEY", "referrerDomain": "yourdomain.com", "fiatAmount": 300, "fiatCurrency": "EUR", "cryptoCurrencyCode": "ETH" } }' ``` ```bash title="Production" curl --request POST \ --url https://api-gateway.transak.com/api/v2/auth/session \ --header 'accept: application/json' \ --header 'access-token: YOUR_ACCESS_TOKEN' \ --header 'authorization: YOUR_USER_AUTH_TOKEN' \ --header 'content-type: application/json' \ --data '{ "widgetParams": { "apiKey": "YOUR_API_KEY", "referrerDomain": "yourdomain.com", "fiatAmount": 300, "fiatCurrency": "EUR", "cryptoCurrencyCode": "ETH" } }' ``` #### Response ```json { "data": { "widgetUrl": "https://global-stg.transak.com?apiKey=YOUR_API_KEY&sessionId=eyJhbGciOiJIUzI1NiIsInR5cCI6IkpXVCJ9.eyJvdHQiOiI2YzgxMDFiMjlhMzg0YWE2YmRjM2JjMmFkODA1M2YzMyIsImlhdCI6MTc1NzMyNTkwNywiZXhwIjoxNzU3MzI2MjA3fQ.zooQ07sGOnI_2dwtIzYL5sOD-Z0wQZoahPxZqZcCVCI" } } ``` On success, the response will include `widgetUrl`. This URL must be used to load the Transak Widget. Use the returned `widgetUrl` to render the Transak widget in your app.
  • The widgetUrl is valid for 5 minutes from creation.
  • Each sessionId can only be used once.
  • The widget cannot be reopened with the same widgetUrl.
  • A new sessionId is required for every fresh user flow.
## Deprecation Notice The old method of embedding query parameters directly in the widget URL is no longer supported. ### Deprecated (Old) ``` https://global.transak.com?apiKey=YOUR_API_KEY&productsAvailed=BUY,SELL&fiatAmount=300&fiatCurrency=GBP&network=ethereum&paymentMethod=credit_debit_card&cryptoCurrencyCode=ETH&hideExchangeScreen=true&walletAddress=0xE99B71B9a035102432e30F47843746e646737b79&disableWalletAddressForm=true ``` ### New (Required) ``` https://global.transak.com?apiKey=YOUR_API_KEY&sessionId=YOUR_SESSION_ID ``` The `sessionId` is returned from the [Create Widget URL](/api/public/create-widget-url) API. ## Additional Required Changes for Web Integrations The Transak widget relies on the browser's **Referer header** as a runtime signal to verify the source domain. Make sure your integration sends this header correctly. ### Redirect Link Do **not** use `rel=noreferrer`. It prevents the Referer header from being sent and breaks runtime domain validation. ```html Buy/Sell Crypto with Transak ``` ```javascript window.open( 'https://global.transak.com/?apiKey=YOUR_API_KEY&sessionId=YOUR_SESSION_ID', '_blank', 'noopener' ); ``` ### iFrame (Embed / Double Embed) Do **not** use `referrerpolicy=no-referrer`. It strips the Referer header and prevents domain validation. Nesting the Transak iframe inside a third-party iframe is **not permitted** unless the parent site has received explicit approval from Transak. Use `referrerpolicy="strict-origin-when-cross-origin"` (recommended) or `"origin"` ```html